What’s NVIDIA NeMo Agent Toolkit?
NVIDIA NeMo Agent Toolkit (let’s call it NAT for short) is an open-source framework for creating AI agents and workflows, integrating various AI tools, frameworks and language models, and using observability libraries and profiling tools to evaluate agents.
In this article, we’re going to see what a sample NAT workflow configuration looks like, and run an agent using the nat CLI.
💡 NAT was formerly known as the NVIDIA Agent Intelligence Toolkit (or AI-Q Toolkit), which was renamed for better integration with the NVIDIA NeMo software suite.
If you’re using the AI-Q Toolkit and wish to migrate to NAT, you can take a look at the migration guide.
A Sample NAT Workflow Configuration
With NAT, you can specify your agent architecture by writing a YAML workflow configuration. Here’s a sample configuration:
functions:
  webpage_query:
    _type: webpage_query
    webpage_url: <https://docs.smith.langchain.com>
    description: "Search for information about LangSmith. For any questions about LangSmith, you must use this tool!"
    embedder_name: nv-embedqa-e5-v5
    chunk_size: 512
  current_datetime:
    _type: current_datetime

llms:
  nim_llm:
    _type: nim
    model_name: meta/llama-3.1-70b-instruct
    temperature: 0.0

embedders:
  nv-embedqa-e5-v5:
    _type: nim
    model_name: nvidia/nv-embedqa-e5-v5

workflow:
  _type: react_agent
  tool_names: [webpage_query, current_datetime]
  llm_name: nim_llm
  verbose: true
  parse_agent_response_max_retries: 3
Let’s go through the configuration piece by piece.
You can find more information in the NAT documentation.
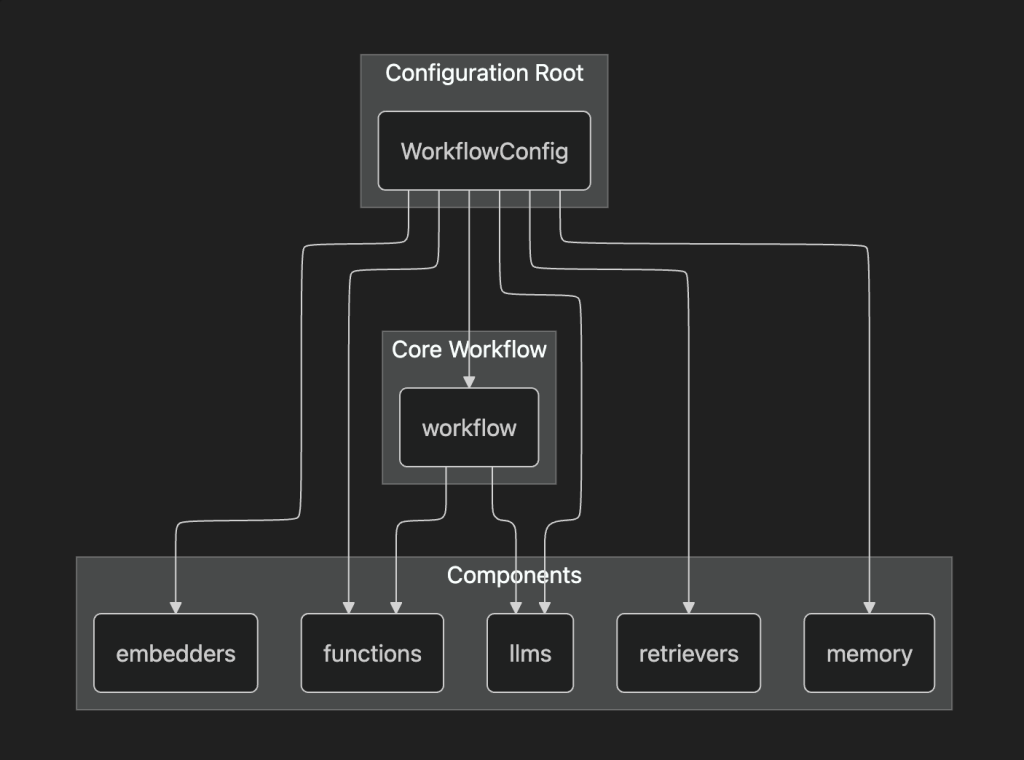
workflow
This contains the main workflow settings that will be passed to the nat CLI when running the agent:
_type: The workflow type.tool_name: The tools that the agent can use. We’ll see how to define tools in thefunctionssection.llm_name: The language model that the agent uses. We’ll see how to define language models in thellmssectionverbose: Whether verbose logging is enabled.parse_agent_response_max_retries: The maximum amount of retries for the ReAct parsing framework.
functions
This contains the tools used in our workflow. Right now, we have a single webpage_query tool, written in Python for more flexibility.
The tools defined here can be used in embedders and retrievers, which we will cover next.
embedders
This provides a way to specify embedding models for our workflow. You can either use NVIDIA’s own NIM, or any tool with support for embeddings.
retrievers
You can use retrievers to get external information for vector stores. Here too, you can either use NIM or any other retriever provider.
llms
This specifies what language models to use in our workflow. At the risk of sounding like a broken record, you can either use NIM or any other supported model.
Here’s a graph representation of the workflow architecture:
How to install the nat CLI
You can run NAT agents using the nat CLI. Let’s see how to install it.
A word of warning: as NAT is still under development, the GitHub repository location and the nat CLI name itself are in constant flux. Please refer to the latest documentation alongside this article when running the nat CLI.
Installing the latest version
You’ll need to clone the Github repository’s development branch and build the nat CLI from source. You can refer to the installation guide for more information.
Installing the stable version
You can install the stable version of NAT using uv .
Using pip directly can work, although we don’t recommend that due to different NAT workflows needing different Python versions and packages, which can mess up your global Python installation.
You can run the uv add command to add NAT to our project.
uv add nvidia-natYou can also add additional agent integrations!
uv add 'nvidia-nat[langchain]' # Add LangChain integrationMake sure to activate the virtual environment for your project.
source ./.venv/bin/activateIf you can run the nat CLI, you’re all set!
$ nat --version
nat, version 1.3.0

$ nat --help
Usage: nat [OPTIONS] COMMAND [ARGS]...

  Main entrypoint for the NAT CLI

Options:
  --version                       Show the version and exit.
  --log-level [debug|info|warning|error|critical]
                                  Set the logging level  [default: INFO]
  --help                          Show this message and exit.

Commands:
  configure     Configure NAT developer preferences.
  eval          Evaluate a workflow with the specified dataset.
  info          Provide information about the local NAT environment.
  mcp           MCP-related commands.
  object-store  Manage object store operations.
  optimize      Optimize a workflow with the specified dataset.
  registry      Utility to configure NAT remote registry channels.
  run           Run a NAT workflow using the console front end.
  serve         Run a NAT workflow using the fastapi front end.
  sizing        Size GPU clusters for workflows with the specified options.
  start         Run a NAT workflow using a front end configuration.
  uninstall     Uninstall plugin packages from the local environment.
  validate      Validate a configuration file
  workflow      Interact with templated workflows.
Running the nat CLI
We need an API key from NVIDIA (NVIDIA_API_KEY ) to run the nat CLI. Create your API key on https://build.nvidia.com/ , and put it in your .env file.
(The nat CLI reads from the .env file by default.)
NVIDIA_API_KEY=<YOUR API KEY HERE>💡 This API key is meant for development, so don’t use it in production!
Let’s create a config.yaml file and put our workflow configuration in there.
functions:
  wiki_search:
    _type: wiki_search
    max_results: 5
  current_datetime:
    _type: current_datetime

llms:
  nim_llm:
    _type: nim
    model_name: meta/llama-3.1-70b-instruct
    temperature: 0.0

workflow:
  _type: react_agent
  tool_names: [wiki_search, current_datetime]
  llm_name: nim_llm
  verbose: true
  parse_agent_response_max_retries: 3
Make sure to add the LangChain integration we talked about in the previous section.
$ uv add 'nvidia-nat[langchain]'💡 Running the nat CLI without the LangChain integration will get us an error: ModuleNotFoundError: No module named 'langchain.schema’.
The LangChain integration is required to use functions like wiki_search.
You can now run the nat CLI!
$ nat run --config_file=./config.yaml --input "What is LangSmith"You can see our agent searches for LangSmith information on Wikipedia, all through LangChain.
2025-11-05 16:35:14 - INFO     - nat.cli.commands.start:192 - Starting NAT from config file: 'config.yaml'

Configuration Summary:
--------------------
Workflow Type: react_agent
Number of Functions: 2
Number of Function Groups: 0
Number of LLMs: 1
Number of Embedders: 0
Number of Memory: 0
Number of Object Stores: 0
Number of Retrievers: 0
Number of TTC Strategies: 0
Number of Authentication Providers: 0

2025-11-05 16:35:17 - INFO     - nat.agent.react_agent.agent:169 -
------------------------------
[AGENT]
Agent input: What is LangSmith
Agent's thoughts:
Thought: I need to find more information about LangSmith to answer the question.
Action: wiki_search
Action Input: {"question": "LangSmith"}

------------------------------
2025-11-05 16:35:30 - INFO     - nat.agent.base:221 -
------------------------------
[AGENT]
Calling tools: wiki_search
Tool's input: {'question': 'LangSmith'}
Tool's response:
<Document source="https://en.wikipedia.org/wiki/LangChain" page=""/>
LangChain is a software framework that helps facilitate the integration of large language models (LLMs) into applications. As a language model integration framework, LangChain's use-cases largely overlap with those of language models in general, including document analysis and summarization, chatbots, and code analysis.


== History ==
LangChain was launched in October 2022 as an open source project by Harrison Chase, while working at machine learning startup Robust Intelligence. In April 2023, LangChain had incorporated and the new startup raised over $20 million in funding at a valuation of at least $200 million from venture firm Sequoia Capital, a week after announcing a $10 million seed investment from Benchmark.
In the third quarter of 2023, the LangChain Expression Language (LCEL) was introduced, which provides a declarative way to define chains of actions.
In October 2023 LangChain introduced LangServe, a deplo...(rest of response truncated)
------------------------------
2025-11-05 16:35:31 - INFO     - nat.agent.react_agent.agent:193 -
------------------------------
[AGENT]
Agent input: What is LangSmith
Agent's thoughts:
Thought: I now know the final answer
Final Answer: LangSmith is a closed-source observability and evaluation platform for LLM applications, released by LangChain in February 2024.
------------------------------
2025-11-05 16:35:31 - INFO     - nat.front_ends.console.console_front_end_plugin:102 - --------------------------------------------------
Workflow Result:
['LangSmith is a closed-source observability and evaluation platform for LLM applications, released by LangChain in February 2024.']
--------------------------------------------------
The final answer in Workflow Result seems appropriate: LangSmith is a closed-source observability and evaluation platform for LLM applications, released by LangChain in February 2024.
Creating Custom Functions
We can also create custom functions! This allows us to use frameworks like Agent Development Kit (ADK), or run tasks defined outside our workflow configuration.
Let’s create a workflows directory, and add the existing text_file_ingest document function.
nat workflow create --workflow-dir workflows text_file_ingest NAT creates a text_file_ingest workflow, with a text_file_ingest.py Python file containing our custom function.
workflows
└── text_file_ingest
    ├── configs -> ./workflows/google_search/src/text_file_ingest/configs
    ├── data -> ./workflows/google_search/src/text_file_ingest/data
    ├── pyproject.toml
    └── src
        └── text_file_ingest
            ├── __init__.py
            ├── __pycache__
            ├── configs
            ├── data
            ├── text_file_ingest.py
            └── register.py
We’ll skip over the details of the directory structure, but in short:
configscontains the workflow settingsdatacontains the sample data used in the workflowregister.pypublishes the workflowtext_file_ingest.pycontains the main function body
You can modify any of the above files and rebuild the workflow with the following command.
nat workflow reinstall text_file_ingestYou also need to install your workflow as a Python package to make it callable.
uv pip install -e workflows/text_file_ingest🚫 You can also delete the workflow using nat workflow delete text_file_ingest . Be careful!
Using ADK to create a Google Search custom function
Let’s apply what we’ve learned so far, and make a custom function using Google Search through ADK. We’ll call it google_search .
nat workflow create --workflow-dir workflows google_searchADK has several built-in tools, making it easy to use Google Search, as you can see in our custom Python function code. All we’re doing is using the ADK Runner!
import logging

from pydantic import Field

from nat.builder.builder import Builder
from nat.builder.framework_enum import LLMFrameworkEnum
from nat.builder.function_info import FunctionInfo
from nat.cli.register_workflow import register_function
from nat.data_models.function import FunctionBaseConfig

logger = logging.getLogger(__name__)

class GoogleSearchFunctionConfig(FunctionBaseConfig, name="google_search"):
    """
    NAT function template. Please update the description.
    """
    description: str = Field(description="Description of the Google Search function.")
    llm_name: str = Field("gemini-2.5-flash")
    user_id: str = Field("user1234", description="User ID for the Google Search function.")
    session_id: str = Field("user1234", description="Session ID for the Google Search function.")

@register_function(config_type=GoogleSearchFunctionConfig, framework_wrappers=[LLMFrameworkEnum.LANGCHAIN])
async def google_search_function(config: GoogleSearchFunctionConfig, builder: Builder):
    """
    Registers a function (addressable via `google_search` in the configuration).
    This registration ensures a static mapping of the function type, `google_search`, to the `GoogleSearchFunctionConfig` configuration object.

    Args:
        config (GoogleSearchFunctionConfig): The configuration for the function.
        builder (Builder): The builder object.

    Returns:
        FunctionInfo: The function info object for the function.
    """

    from google.adk.agents import Agent
    from google.adk.runners import Runner
    from google.adk.sessions import InMemorySessionService
    from google.adk.tools import google_search
    from google.genai import types

    APP_NAME="basic_search_agent"

    root_agent = Agent(
        name=APP_NAME,
        model=config.llm_name,
        description=config.description,
        instruction="I can answer your questions by searching the internet. Just ask me anything!",
        tools=[google_search]
    )

    # Session and Runner
    async def setup_session_and_runner():
        session_service = InMemorySessionService()
        session = await session_service.create_session(app_name=APP_NAME, user_id=config.user_id, session_id=config.session_id)
        runner = Runner(agent=root_agent, app_name=APP_NAME, session_service=session_service)
        return session, runner

    # Agent Interaction
    session, runner = await setup_session_and_runner()

    async def call_agent_async(query) -> str:
        content = types.Content(role='user', parts=[types.Part(text=query)])
        events = runner.run_async(user_id=config.user_id, session_id=config.session_id, new_message=content)
        final_response = ""

        async for event in events:
            if event.is_final_response():
                final_response = event.content.parts[0].text
                print("Agent Response: ", final_response)

        return final_response

    async def _inner(query: str) -> str:

        return await call_agent_async(query)

    yield FunctionInfo.from_fn(_inner, description=config.description)
To use ADK, we need to add the ADK integration package as a dependency to the workflow’s pyproject.toml .
"nvidia-nat[adk]~=1.3",Build and install the workflow, and you’ll be able to reference and use it!
Be sure to log in using the gcloud CLI before using the workflow.
gcloud auth application-default loginHere’s our updated workflow configuration, with the google_search function referenced and enabled.
functions:
  google_search:
    _type: google_search
    description: "Search the internet using Google Search."
  current_datetime:
    _type: current_datetime

llms:
  nim_llm:
    _type: nim
    model_name: meta/llama-3.1-70b-instruct
    temperature: 0.0

workflow:
  _type: react_agent
  tool_names: [google_search, current_datetime]
  llm_name: nim_llm
  verbose: true
  parse_agent_response_max_retries: 3
We can now run our updated workflow, and our agent is using ADK to perform Google searches.
$ nat run --config_file=./config.yaml --input "What is LangSmith"

...

2025-11-11 15:15:55 - INFO     - google_adk.google.adk.models.google_llm:113 - Sending out request, model: gemini-2.5-flash, backend: GoogleLLMVariant.VERTEX_AI, stream: False
2025-11-11 15:15:55 - INFO     - google_genai.models:6850 - AFC is enabled with max remote calls: 10.
2025-11-11 16:33:42 - INFO     - google_adk.google.adk.models.google_llm:161 - Response received from the model.
Agent Response:

...

------------------------------
2025-11-11 15:16:03 - INFO     - nat.agent.react_agent.agent:193 -
------------------------------
[AGENT]
Agent input: What is LangSmith
Agent's thoughts:
Thought: I now know the final answer

Final Answer: LangSmith is a comprehensive platform designed for developing, debugging, evaluating, and deploying applications built with large language models (LLMs). It provides a unified environment to manage the entire lifecycle of LLM applications, from local development to production, and offers features such as observability, debugging and tracing, evaluation, prompt testing and versioning, deployment, framework agnosticism, and compliance.
------------------------------
2025-11-11 15:16:03 - INFO     - nat.front_ends.console.console_front_end_plugin:102 - --------------------------------------------------
Workflow Result:
['LangSmith is a comprehensive platform designed for developing, debugging, evaluating, and deploying applications built with large language models (LLMs). It provides a unified environment to manage the entire lifecycle of LLM applications, from local development to production, and offers features such as observability, debugging and tracing, evaluation, prompt testing and versioning, deployment, framework agnosticism, and compliance.']
--------------------------------------------------
Conclusion
We’ve just covered what NeMo Agent Toolkit is, and how to create our own functions using ADK!
NeMo Agent Toolkit is designed to be CLI-first. Developers can create workflow functions, and users can create a workflow configuration to orchestrate and run these workflow functions.
This allows for various deployment strategies. For example, you can use Google Cloud Workflows to run NAT workflows as tasks!
It still remains to be seen what the best way is forward for both developers and users. How does this affect your Git strategy for example?