概要
こんにちは佐藤慧太@SatohJohnです。
NVIDIA NeMo Agent Toolkit(以下、この記事ではNATと呼ぶことにします)は生成AIに関する様々なツール・フレームワーク・言語モデルを組み合わせて、Pythonで生成AIエージェントまたはそれを組み込んだワークフローを作ることのできるライブラリです。以下、生成AIエージェントのことを単にエージェントと呼びます。
エージェントを可観測(Observability)にするライブラリやプロファイリングツール、エージェントの評価ツールも組み込むことができます。
💡 NAT は以前 NVIDIA Agent Intelligence Toolkit (AI-Q toolkit)という名前でした。NVIDIA NeMo ファミリーとの整合を図るため変更されています。
マイグレーションとしては https://github.com/NVIDIA/NeMo-Agent-Toolkit/blob/develop/docs/source/resources/migration-guide.md の通りになっています。
Workflow Configuration
NATでは、エージェントの構成要素をWorkflow Configurationと呼ばれるyamlファイルで書くことができます。以下がその例です。
functions:
  webpage_query:
    _type: webpage_query
    webpage_url: https://docs.smith.langchain.com
    description: "Search for information about LangSmith. For any questions about LangSmith, you must use this tool!"
    embedder_name: nv-embedqa-e5-v5
    chunk_size: 512
  current_datetime:
    _type: current_datetime

llms:
  nim_llm:
    _type: nim
    model_name: meta/llama-3.1-70b-instruct
    temperature: 0.0

embedders:
  nv-embedqa-e5-v5:
    _type: nim
    model_name: nvidia/nv-embedqa-e5-v5

workflow:
  _type: react_agent
  tool_names: [webpage_query, current_datetime]
  llm_name: nim_llm
  verbose: true
  parse_agent_response_max_retries: 3
それぞれの要素について軽く説明をします。
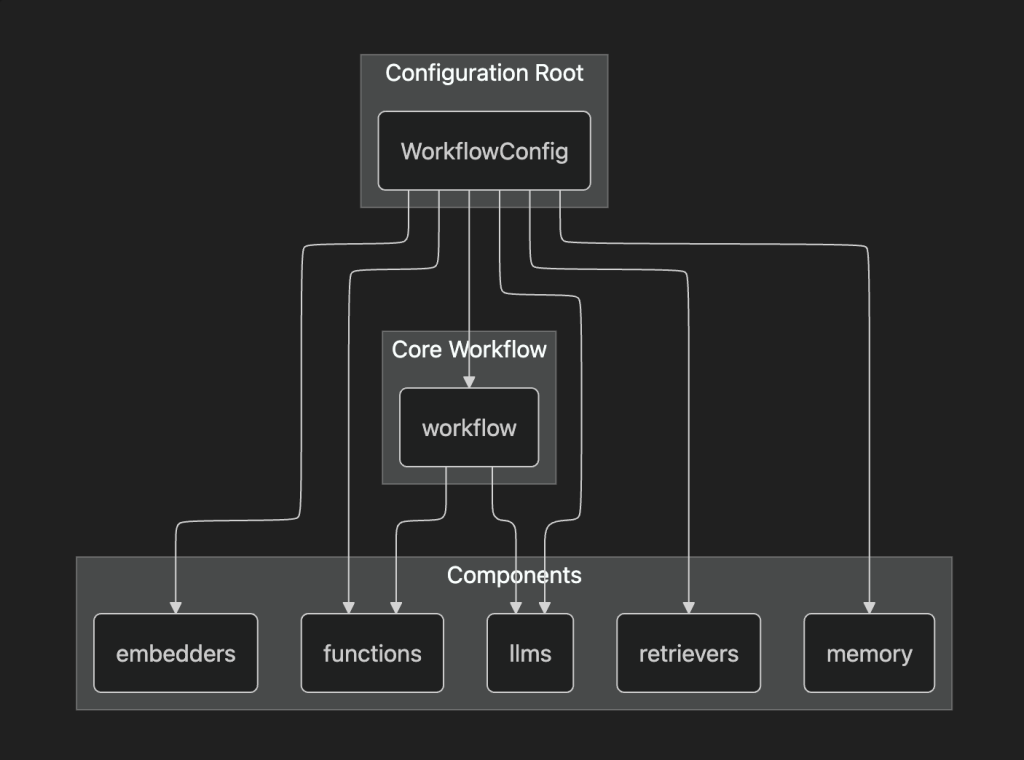
workflow
エージェントとして定義するワークフローの設定です。それぞれの項目はいかのパラメーターを指定します。基本的にはこれを起点として後述する nat CLIツールで呼び出してエージェントを起動することができます。
_type: エージェントの種類tool_name: エージェントが使うことのできるツールを定義します。後述するfunctionsで定義されているものが使えます。llm_name: エージェントはここで指定したLLMを使って動きます。後述するllmで定義されているものが使えます。verbose: ログの詳細を出すかどうかです。parse_agent_response_max_retries: これはエージェントの種類「ReAct Agent」で使用される設定です。ReAct推論フレームワークにおいて最大のリトライ回数をしてします。
functions
エージェントが使用できるツールを複数定義できます。この挙動はPythonによって記述することができます。例えば、今回のyamlにある webpage_query は自作したPythonのコードのものになります。
このパラメーターはツールによって異なります。後述するembeddersやretriversが定義してあれば、それらを参照して使うことができます。
embedders
LLMのEmbedding機能を使うことができます。これにはNVIDIAの提供するNIMを指定することができるか、対応しているツールも指定することが可能です。
retrievers
外部から情報を取ってくる機能を使うことができます。これもNVIDIAの提供するNIMを指定することが可能です。
llms
大規模生成言語のモデルを指定できます。これもNVIDIAの提供するNIMを指定することが可能です。
構成としては以下のイメージが近いかと思われます。
NATのCLI nat のインストール方法
NATでは nat と呼ばれるCLIツールを使うことでエージェントを動かすことができます。
ここからの注意事項として、まだNATが開発途中のツールであるためか、GitHubリポジトリの名前がちょくちょく変更されていたり、 nat CLIツールの名前も安定していないようです。ですので、動かす際はドキュメントが最新の表記になっているかどうか気をつけて動かす必要があります。
最新版のインストール方法
https://github.com/NVIDIA/NeMo-Agent-Toolkit
の development ブランチにあるものはソースコードから nat をビルドする必要があります。
ソースコードからインストールする方法については以下のリンクのドキュメントが参考になります。
安定版のインストール方法
github インストール方法ではpipからインストールすることができますが、基本的には uv によるインストールを推奨します。NATのワークフローなどのコンポーネントはPythonの環境ごとに管理されるので、グローバル環境にインストールしてしまうと、意図しないコンポーネントが混ざってしまうからです。
Pythonのプロジェクト管理ツール uv では以下のコマンドでプロジェクトに追加できます。
uv add nvidia-nat
外部ツールを組み込むためのライブラリもインストールできます。
uv add 'nvidia-nat[langchain]' # LangChainをエージェントに組み込むための追加の依存関係をインストール仮想環境をonにしていただければと思います
source ./.venv/bin/activate
以下このマンドを実行して動くことを確認してください
$ nat --version
nat, version 1.3.0

$ nat --help
Usage: nat [OPTIONS] COMMAND [ARGS]...

  Main entrypoint for the NAT CLI

Options:
  --version                       Show the version and exit.
  --log-level [debug|info|warning|error|critical]
                                  Set the logging level  [default: INFO]
  --help                          Show this message and exit.

Commands:
  configure     Configure NAT developer preferences.
  eval          Evaluate a workflow with the specified dataset.
  info          Provide information about the local NAT environment.
  mcp           MCP-related commands.
  object-store  Manage object store operations.
  optimize      Optimize a workflow with the specified dataset.
  registry      Utility to configure NAT remote registry channels.
  run           Run a NAT workflow using the console front end.
  serve         Run a NAT workflow using the fastapi front end.
  sizing        Size GPU clusters for workflows with the specified options.
  start         Run a NAT workflow using a front end configuration.
  uninstall     Uninstall plugin packages from the local environment.
  validate      Validate a configuration file
  workflow      Interact with templated workflows.
NAT を動かす
利用には NVIDIA_API_KEY が必要になります。https://build.nvidia.com/ にアクセスをしていただきkeyを取得します。取得した key を利用して、以下のように .env ファイルを作成します。
💡 こちらで取得したAPI_KEYは検証用途のものと言うことで、本番利用には使用しないでください
デフォルトで nat コマンドが .env ファイルを読み込みます。
NVIDIA_API_KEY=<取得したkey>
config.yaml を以下のように作成します。
functions:
  wiki_search:
    _type: wiki_search
    max_results: 5
  current_datetime:
    _type: current_datetime

llms:
  nim_llm:
    _type: nim
    model_name: meta/llama-3.1-70b-instruct
    temperature: 0.0

workflow:
  _type: react_agent
  tool_names: [wiki_search, current_datetime]
  llm_name: nim_llm
  verbose: true
  parse_agent_response_max_retries: 3
langchain のコンポーネントを利用しますので、以下のようにライブラリを追加します。
$ uv add 'nvidia-nat[langchain]'💡 nvidia-nat で nat run した場合 ModuleNotFoundError: No module named 'langchain.schema’ となります。
また、wiki_search は以下のように提供されており、 langchain のコンポーネントを追加することで使えます。
https://docs.nvidia.com/nemo/agent-toolkit/latest/api/nat/plugins/langchain/tools/wikipedia_search/index.html
以下のようにコマンドで実行します。
$ nat run --config_file=./config.yaml --input "What is LangSmith"すると以下のように LangSmith をもとに LangChain を wikipedia から検索しています。
2025-11-05 16:35:14 - INFO     - nat.cli.commands.start:192 - Starting NAT from config file: 'config.yaml'

Configuration Summary:
--------------------
Workflow Type: react_agent
Number of Functions: 2
Number of Function Groups: 0
Number of LLMs: 1
Number of Embedders: 0
Number of Memory: 0
Number of Object Stores: 0
Number of Retrievers: 0
Number of TTC Strategies: 0
Number of Authentication Providers: 0

2025-11-05 16:35:17 - INFO     - nat.agent.react_agent.agent:169 -
------------------------------
[AGENT]
Agent input: What is LangSmith
Agent's thoughts:
Thought: I need to find more information about LangSmith to answer the question.
Action: wiki_search
Action Input: {"question": "LangSmith"}

------------------------------
2025-11-05 16:35:30 - INFO     - nat.agent.base:221 -
------------------------------
[AGENT]
Calling tools: wiki_search
Tool's input: {'question': 'LangSmith'}
Tool's response:
<Document source="https://en.wikipedia.org/wiki/LangChain" page=""/>
LangChain is a software framework that helps facilitate the integration of large language models (LLMs) into applications. As a language model integration framework, LangChain's use-cases largely overlap with those of language models in general, including document analysis and summarization, chatbots, and code analysis.


== History ==
LangChain was launched in October 2022 as an open source project by Harrison Chase, while working at machine learning startup Robust Intelligence. In April 2023, LangChain had incorporated and the new startup raised over $20 million in funding at a valuation of at least $200 million from venture firm Sequoia Capital, a week after announcing a $10 million seed investment from Benchmark.
In the third quarter of 2023, the LangChain Expression Language (LCEL) was introduced, which provides a declarative way to define chains of actions.
In October 2023 LangChain introduced LangServe, a deplo...(rest of response truncated)
------------------------------
2025-11-05 16:35:31 - INFO     - nat.agent.react_agent.agent:193 -
------------------------------
[AGENT]
Agent input: What is LangSmith
Agent's thoughts:
Thought: I now know the final answer
Final Answer: LangSmith is a closed-source observability and evaluation platform for LLM applications, released by LangChain in February 2024.
------------------------------
2025-11-05 16:35:31 - INFO     - nat.front_ends.console.console_front_end_plugin:102 - --------------------------------------------------
Workflow Result:
['LangSmith is a closed-source observability and evaluation platform for LLM applications, released by LangChain in February 2024.']
--------------------------------------------------
回答は最後の Workflow Result における LangSmith is a closed-source observability and evaluation platform for LLM applications, released by LangChain in February 2024. になります。
自作 function の作成
functions は自作ができます。自作することで Agent Development Kit(以後 ADK) などのフレームワークとの連携や、別定義のタスク実行などができます。
workflows ディレクトリを作成して、以下のように環境を作成します。
nat workflow create --workflow-dir workflows {workflow名} workflow-dir は存在している必要があります。
ドキュメントの例として登録されている text_file_ingest を作成する場合は以下のようになります。
nat workflow create --workflow-dir workflows text_file_ingest
workflows の中に text_file_ingest が作成されており、 src ディレクトリの中に text_file_ingest.py が入っていると思います。このファイルが関数を記載する場所になります。
workflows
└── text_file_ingest
    ├── configs -> ./workflows/google_search/src/text_file_ingest/configs
    ├── data -> ./workflows/google_search/src/text_file_ingest/data
    ├── pyproject.toml
    └── src
        └── text_file_ingest
            ├── __init__.py
            ├── __pycache__
            ├── configs
            ├── data
            ├── text_file_ingest.py
            └── register.py
各ディレクトリの詳細は省きますが、 config は workflow 自体の設定、 data は workflow で利用するサンプルデータを入れておきます。 register.py を通して公開します。
それらをsrc の中に全部入れ install をすることで利用することができるイメージです。
サンプルとして text_file_ingest.py の中身が入った状態になっているので、これをベースに修正していく形になります。
修正したものは以下のようなコマンドで workflow を build しておきます。
nat workflow reinstall {workflow名}
そして、workflow が呼び出せるようにするために、利用側としては install をする必要があります。作成された workflow が別Python プロジェクトとして作成されているためです。
uv pip install -e workflows/{workflow名}
🚫 nat workflow delete {workflow名} を行うとディレクトリごと削除されるので注意してください。
ADK を使って Google Search を行う functions を入れてみる
上記までのやり方に沿って、新しく function を作成してみます。
ADK を利用して Google 検索を行うものを作成してみます。名前を google_search とします。
nat workflow create --workflow-dir workflows google_search
ADK では複数の tool が built in されておりこちらにより簡単に Google 検索が利用できます。 https://google.github.io/adk-docs/tools/built-in-tools/#google-search
完成形の Python は以下のようになります。
import logging

from pydantic import Field

from nat.builder.builder import Builder
from nat.builder.framework_enum import LLMFrameworkEnum
from nat.builder.function_info import FunctionInfo
from nat.cli.register_workflow import register_function
from nat.data_models.function import FunctionBaseConfig

logger = logging.getLogger(__name__)


class GoogleSearchFunctionConfig(FunctionBaseConfig, name="google_search"):
    """
    NAT function template. Please update the description.
    """
    description: str = Field(description="Description of the Google Search function.")
    llm_name: str = Field("gemini-2.5-flash")
    user_id: str = Field("user1234", description="User ID for the Google Search function.")
    session_id: str = Field("user1234", description="Session ID for the Google Search function.")


@register_function(config_type=GoogleSearchFunctionConfig, framework_wrappers=[LLMFrameworkEnum.LANGCHAIN])
async def google_search_function(config: GoogleSearchFunctionConfig, builder: Builder):
    """
    Registers a function (addressable via `google_search` in the configuration).
    This registration ensures a static mapping of the function type, `google_search`, to the `GoogleSearchFunctionConfig` configuration object.

    Args:
        config (GoogleSearchFunctionConfig): The configuration for the function.
        builder (Builder): The builder object.

    Returns:
        FunctionInfo: The function info object for the function.
    """

    from google.adk.agents import Agent
    from google.adk.runners import Runner
    from google.adk.sessions import InMemorySessionService
    from google.adk.tools import google_search
    from google.genai import types

    APP_NAME="basic_search_agent"

    root_agent = Agent(
        name=APP_NAME,
        model=config.llm_name,
        description=config.description,
        instruction="I can answer your questions by searching the internet. Just ask me anything!",
        tools=[google_search]
    )

    # Session and Runner
    async def setup_session_and_runner():
        session_service = InMemorySessionService()
        session = await session_service.create_session(app_name=APP_NAME, user_id=config.user_id, session_id=config.session_id)
        runner = Runner(agent=root_agent, app_name=APP_NAME, session_service=session_service)
        return session, runner

    # Agent Interaction
    session, runner = await setup_session_and_runner()

    async def call_agent_async(query) -> str:
        content = types.Content(role='user', parts=[types.Part(text=query)])
        events = runner.run_async(user_id=config.user_id, session_id=config.session_id, new_message=content)
        final_response = ""

        async for event in events:
            if event.is_final_response():
                final_response = event.content.parts[0].text
                print("Agent Response: ", final_response)

        return final_response

    async def _inner(query: str) -> str:

        return await call_agent_async(query)


    yield FunctionInfo.from_fn(_inner, description=config.description)
処理としては ADK の Runner の処理をそのまま利用しているだけです。最終的に FunctionInfo.from_fn を通して利用できるようにしています。
adk を利用するということで workflows/google_search のなかの pyproject.toml のなかで依存関係として以下を追加する必要があります。初期状態としては nvidia-nat[langchain] が入っていると思います。
"nvidia-nat[adk]~=1.3",追加後にbuild をして、install を実行することで、参照が通るようになります。以後コードを修正するだけで基本は反映が行われます。
起動前に ADK 内部の Google Search や Gemini アクセスのための認証情報を設定しておく必要があります。
gcloud auth application-default login
呼び出す側の workflow の yaml は以下のようになります。 google_search の方に user_id や llm_name など適宜修正をしてみていただければと思います。
functions:
  google_search:
    _type: google_search
    description: "Search the internet using Google Search."
  current_datetime:
    _type: current_datetime

llms:
  nim_llm:
    _type: nim
    model_name: meta/llama-3.1-70b-instruct
    temperature: 0.0

workflow:
  _type: react_agent
  tool_names: [google_search, current_datetime]
  llm_name: nim_llm
  verbose: true
  parse_agent_response_max_retries: 3
このワークフローを実施すると以下のように動きます
$ nat run --config_file=./config.yaml --input "What is LangSmith"


中略

2025-11-11 15:15:55 - INFO     - google_adk.google.adk.models.google_llm:113 - Sending out request, model: gemini-2.5-flash, backend: GoogleLLMVariant.VERTEX_AI, stream: False
2025-11-11 15:15:55 - INFO     - google_genai.models:6850 - AFC is enabled with max remote calls: 10.
2025-11-11 16:33:42 - INFO     - google_adk.google.adk.models.google_llm:161 - Response received from the model.
Agent Response:

中略

------------------------------
2025-11-11 15:16:03 - INFO     - nat.agent.react_agent.agent:193 -
------------------------------
[AGENT]
Agent input: What is LangSmith
Agent's thoughts:
Thought: I now know the final answer

Final Answer: LangSmith is a comprehensive platform designed for developing, debugging, evaluating, and deploying applications built with large language models (LLMs). It provides a unified environment to manage the entire lifecycle of LLM applications, from local development to production, and offers features such as observability, debugging and tracing, evaluation, prompt testing and versioning, deployment, framework agnosticism, and compliance.
------------------------------
2025-11-11 15:16:03 - INFO     - nat.front_ends.console.console_front_end_plugin:102 - --------------------------------------------------
Workflow Result:
['LangSmith is a comprehensive platform designed for developing, debugging, evaluating, and deploying applications built with large language models (LLMs). It provides a unified environment to manage the entire lifecycle of LLM applications, from local development to production, and offers features such as observability, debugging and tracing, evaluation, prompt testing and versioning, deployment, framework agnosticism, and compliance.']
--------------------------------------------------
こちらにより Agent Development Kit をとおして、Google Search を呼び出せていることがわかります。
まとめ
NeMo Agent Toolkit の紹介と、関数の自作、そして ADK を使った形での実装について紹介しました。
NeMo Agent Toolkit は CLI として簡単に実行ができるように設計されています。開発者が workflows の関数などを作成をしておき、利用者は作られた Agent をオーケストレートする Config を作成し、起動するという形になります。
Google Cloud 上で同じ workflow を動かすとなった場合は Google Cloud の Workflows のタスクとして動かしてくパターンが考えられます。
現状まだ、どの用に利用者と開発者が NeMo Agent Toolkit を使って開発を進めていくのがベターか(例えば git 戦略など)は、考える余地がありそうです。