
1. はじめに
はじめまして、Sreake事業部の井上 秀一です。私はSreake事業部にて、SREや生成AIに関するResearch & Developmentを行っています。本記事は、Google Cloud の Vertex AI Agent Engine を前提に、現場でつまずきやすいポイントを「最短で失敗しない」順にまとめた運用TIPS集です。
概要
エージェントをプロダクトとして安全に提供するという事は、モデル選定だけでは済みません。認証・認可、セッション管理、監査、可観測性、そしてユーザ体験までを含んだ運用設計が主役になります。
- 対象読者は、次のいずれかに当てはまる方です。
- これから Agent Engine を社内外ユーザ向けサービスに組み込むアーキテクト/プラットフォームエンジニア
- ADK・LangChain・LangGraph 等でエージェント実装を担当する開発者
- セキュリティ/SRE/プロダクト運用の責任を持つリードやテックリード
- 本記事でわかることの概要は以下です。
- フロントエンド/バックエンドを前段に置いた安全な公開アーキテクチャの考え方
- Audit Logging をどこで集約すれば開発負荷と可観測性のバランスが取れるか
- Memory Bank を使う際の利点とリスク
- Agentの文脈における可観測性パターンと、コストを含む運用判断
- Agent Engine で動かす際のリソース制限・ツール実行性のリアル
- LangChain/LangGraph をAgent Engine 主体で使うときの落とし穴
- エージェントの評価(Evaluate)をCIに載せるための最低限の型
- また、前提と範囲を以下になります。
- 記載の仕様・数値は2025年9月23日時点の情報を基にしています。将来的な変更の可能性があります。
- 本記事における「安全」とは、主に認証・認可・監査・可観測性の観点です。データガバナンスや法務要件は組織基準を優先してください。
- コードは最小限のスニペットで示し、細部は公式ドキュメント参照を前提とします。
2. Agent Engineを利用したサービスの提供時に考慮すべき内容
A. 全体像
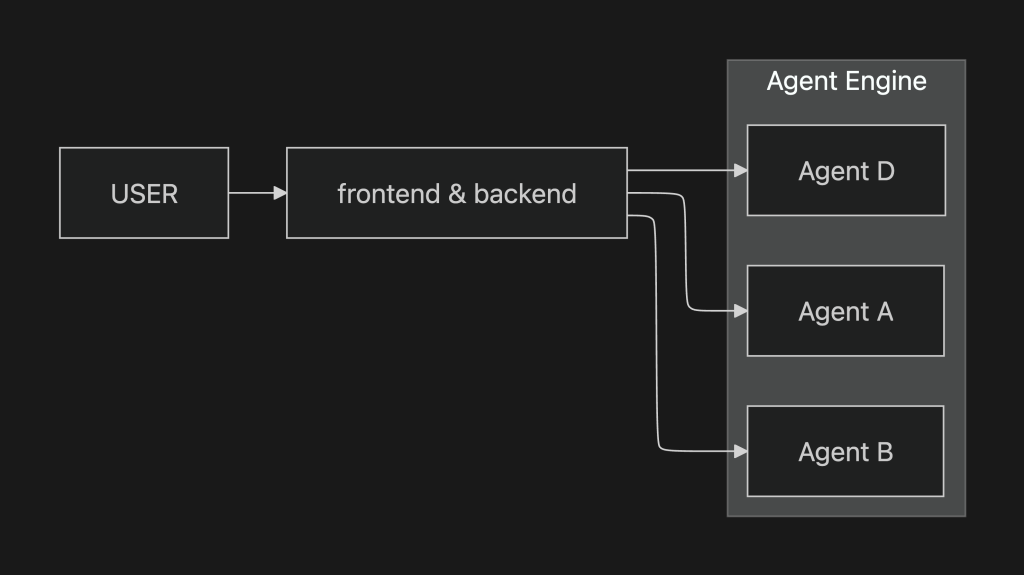
ここでは、Agent Engineをプロダクト・プラットフォームとして利用する際のアーキテクチャ例を示します。Agent Engineは自由にuserやsession_idを受け取れるため、直接公開すると改ざんリスクが高いです。したがって、バックエンドで認証・認可を行い、内部専用のIDにマッピングしてからAgent Engineへ渡すことが求められます。Agent Engineを安全に提供するには、フロントエンドおよびバックエンドを前段に配置し、認証・認可やセッション管理を集約する構造が必須です。
| レイヤ | 主要責務 |
|---|---|
| Frontend | – UI/UXの提供 – ユーザ認証フローの起点 |
| Backend | – 認証・認可(OAuth2/OIDCなど) – Session IDの発行・管理 – ユーザ属性および監査ログの永続化 – Agent EngineへのAPI Proxy – Audit Logging |
| Agent Engine | – マルチエージェント実行環境 – 各エージェントの対話・推論 |
アクセス制御は、アーキテクチャ的にフロントエンドおよびバックエンドコンポーネントで行うことが望ましいです。Agent EngineやAgentでアクセス制御を行う場合、接続情報を個別に解析して設定する必要があり、工数が増加します。
B. Audit Logging
ここでは、Agent EngineおよびAgentの運用で必要となる監査について、観点別に整理します。
監査観点:ユーザからのアクセスについて
Audit Loggingは、組織が法規制を順守し、不正操作を抑止し、インシデント発生時に迅速な原因特定と再発防止を行うために不可欠です。Agent Engineでは、次の2パターンのAudit Loggingが考えられます。
| 項目 | パターン1 | パターン2 |
|---|---|---|
| ロギングの場所 | Agent Engineの前段コンポーネント | Agent本体 |
| 実装対象 | 認証・認可処理に加えて監査ログを統合 | 追加要件に応じてAudit Log Middlewareを挿入 |
| 主なメリット | ログ基盤を統一でき、Agent開発者の負担を軽減 | 要件に応じた詳細なログ出力が可能で高度なトレーシングに対応 |
| 開発者の負担 | ほぼなし(前段で集約) | – ミドルウェアの実装・設定が必要 – 社内ガイドラインの制定・順守が求められる – 開発規模に比例して実装・学習コストが増加 |
| 実装方法の例 | 既存の統合ログ基盤等に送信 | – Agentフレームワークおよび送付先に応じた実装が必要 – 学習コスト増 |
パターン2を実施する場合、ADKで作成したAgentには、モデル呼び出しや応答後に追加操作を行う方法が提供されています。公式ドキュメントによれば、以下の方法でLogs Explorerに出力できます。
def auditlog_middleware(callback_context: CallbackContext, llm_request: LlmRequest):
    """Audit log middleware for logging LLM requests.

    Args:
        callback_context (CallbackContext): The callback context for the request.
        llm_request (LlmRequest): The LLM request to log.
    """

    import logging
    import google.cloud.logging
    from google.cloud.logging_v2.handlers import StructuredLogHandler

    log_client = google.cloud.logging.Client()
    log_client.setup_logging()

    audit_log = {
        "custom_audit_log": {
            "agent_name": str(callback_context.agent_name),
            "user_id": str(callback_context._invocation_context.user_id),
            "llm_request": str(llm_request.contents),
        }
    }

    logging.info(json.dumps(audit_log))

# LLM Agentを作成する
root_agent = LlmAgent(
    model="gemini-2.0-flash",
    name="stateful_agent",
    instruction="""You are a Vehicle Voice Agent, designed to assist users with information and in-vehicle actions.
""",
    before_model_callback=auditlog_middleware,
)
監査観点:ユーザ・Agentの会話内容
ADKで作成したAgentでは、ユーザとAgent間の会話履歴を参照できます(docs)。
# Sessionの持ち主の情報
curl -X GET \\
    -H "Authorization: Bearer $(gcloud auth print-access-token)" \\
    "<https://$>{location}-aiplatform.googleapis.com/v1beta1/projects/${project_id}/locations/${location}/reasoningEngines/${agent_engine_id}/sessions/${session_id}"

{
  "name": "projects/xxxxxxxxxx/locations/us-central1/reasoningEngines/7690556070711787520/sessions/7506878805001109504",
  "createTime": "2025-07-29T23:14:17.654897Z",
  "updateTime": "2025-07-29T23:15:30.812664Z",
  "userId": "user_1" # ユーザ情報
}
# Session内部の会話履歴
curl -X GET \\
-H "Authorization: Bearer $(gcloud auth print-access-token)" \\
"<https://$>{location}-aiplatform.googleapis.com/v1beta1/projects/${project_id}/locations/${location}/reasoningEngines/${agent_engine_id}/sessions/${session_id}/events"
{
"sessionEvents": [
{
"name": "projects/xxxxxxxxxx/locations/us-central1/reasoningEngines/7690556070711787520/sessions/7506878805001109504/events/2705186457055657984",
"author": "user",
"content": {
"role": "user",
"parts": [
{
"text": "私の好きな温度を知っていますか?"
}
]
},
"invocationId": "e-5db690a9-8789-4cfd-bed9-a910d69c842a",
"actions": {},
"timestamp": "2025-07-29T23:15:28.928029060Z",
"eventMetadata": {}
},
{
...ただし、AgentToolやToolの操作内容の詳細は、Session内に保持されません。
監査観点:Tool利用時のログ要件
Toolレイヤに独自のAudit Logを設ける必要は原則としてありません。
- 理由
- Agentは既存システム(外部API・DB・SaaSなど)の代理操作を行うのみであり、既存システム側から見れば通常のユーザ操作と同等です。
- アクセス制御や操作履歴は既存システムの認証・認可レイヤで一元管理できます。
- Agent側でログを二重取得すると保管コストや調査経路が増大し、運用負荷が高まります。
監査要件の整理
| 項目 | 説明 | 推奨実装箇所 |
|---|---|---|
| 利用者識別 | 誰がリクエストしたかを記録 | 外部ツールの認証レイヤ |
| 操作内容 | APIエンドポイント/パラメータ | 外部ツールのアクセスログ |
| 成否・ステータス | HTTPステータスやエラーメッセージ | 外部ツール |
| 補足情報 | LLM推論経路など | (必要に応じて)Agent側でデバッグ用に保持 |
3. 2025年9月23日時点のAgent Engineの性能(docs)
- デフォルト値:
resource_limitsのデフォルトは{"cpu": "4", "memory": "4Gi"}です。 - 設定方法:
agent_engines.createメソッドのconfig引数内で、CPUおよびメモリのリソース制限を指定します。
remote_agent = client.agent_engines.create(
    agent=local_agent,
    config={
        "min_instances": 1,
        "max_instances": 10,
        "resource_limits": {"cpu": "4", "memory": "8Gi"},
        # ... other configs
    }
)
- CPU設定値:
'1','2','4','6','8'がサポートされています。 - メモリ設定値:
'1Gi'から'32Gi'までの範囲がサポートされています。
4. Vertex AI Agent Engine Memory Bank
A. 概要
Vertex AI Agent Engine Memory Bankは、ユーザーとエージェントの会話に基づいて長期記憶を動的に生成するサービスです。特定のユーザーの複数セッションにわたってアクセスできるパーソナライズされた情報を保持し、エージェントはこれらの記憶を活用してユーザーへの応答を個別化し、セッション間の継続性を実現できます。
B. 機能
- 複数の環境からアクセスできるメモリの永続ストレージを提供します。Vertex AI Agent Engineセッションとメモリバンクは、Vertex AI Agent Engineにデプロイされたエージェント、ローカル環境、またはその他のデプロイメントオプションで利用可能です。
- 大規模言語モデル(LLM)に基づくセッションからの記憶の抽出が可能です。
- メモリはリモートで非同期的に生成されるため、エージェントはメモリ生成を待つ必要がありません。必要に応じて手動で生成することもできます。
- 類似性検索に基づく記憶の検索が可能です。
- Vertex AI Agent Engine Memory BankをAgent Development Kit(ADK)と併用することで、エージェントは自動的に長期メモリの読み取りと書き込みを行います。
C. メモリバンクとVertex AI Agent Engineの連携プロセス
メモリバンクはVertex AI Agent Engineセッションと統合され、保存されたセッションから記憶を生成します。このプロセスは以下の手順で進行します。
- セッション作成(CreateSession): 会話の開始時に新しいセッションが作成され、会話履歴がこのセッションにスコープされます。
- イベント追加(AppendEvent): ユーザーとエージェントの対話内容(メッセージ、応答、ツールアクションなど)がセッションにアップロードされ、履歴として記録されます。
- イベントリスト(ListEvents): エージェントはユーザーとの会話中に履歴を取得し、文脈を理解します。
- 記憶の生成または作成(GenerateMemories/CreateMemory):
- GenerateMemoriesでは、指定されたタイミング(例:各セッション終了時や各ターン終了時)に会話履歴から自動的にユーザーに関する事実を抽出して記憶を生成します。
- CreateMemoryでは、エージェントが任意のタイミングで記憶を直接メモリバンクに書き込むことができます。これにより、保存情報や書き込みタイミングを細かく制御できます。
- 記憶の取得(RetrieveMemories): エージェントはユーザーとの会話時に保存済みの記憶を取得します。全記憶の取得(単純取得)または会話文脈に最も関連性の高い記憶のみを取得(類似性検索取得)することができ、取得した記憶はプロンプトに挿入して利用されます。
D. 注意事項
Vertex AI Agent Engine Memory Bank overview によると、メモリバンク利用時にはプロンプトインジェクションおよびメモリポイズニングのリスクが存在します。メモリポイズニングとは、誤情報がメモリバンクに保存され、その結果エージェントが次回以降のセッションで誤った、あるいは悪意ある情報に基づいて動作する可能性があることを指します。これを軽減するための手法として、以下の対策が提案されています。
- Model Armorの使用: メモリバンクまたはエージェントから送信されるプロンプトを検査し、不正な入力を検出します。
- 敵対的テスト: プロンプトインジェクションに対する脆弱性を確認するため、攻撃をシミュレートしてテストします。
- サンドボックス実行: エージェントが外部システムと連携・操作する場合は、厳格なアクセス制御および人間によるレビューを行うサンドボックス環境で実行する必要があります。
E. 使い勝手
- メモリの生成方法には手動生成と自動生成があります(docs参照)。
- メモリ生成はセッションごとに設定が必要です。
- メモリ内容は
roles/aiplatform.userロールを持つユーザーであれば参照可能です。個人の嗜好や趣味などプライバシーに関わる情報を含むため、扱いには十分な注意が求められます。 - ADKで作成されたエージェントには標準で有効化されていますが、他のフレームワークで作成されたエージェントでは別途実装が必要です。
F. サンプルコード
Agent Engine上のセッションに手動でMemoryを生成(*Quickstart with REST API を参考に既に存在するセッションに対してメモリ生成を行うアプローチ)
Deploy Agent to AgentEngine
import os

import vertexai
from google.adk.agents import (
    LlmAgent,
)
from vertexai import agent_engines

# GCPプロジェクトIDとロケーションを設定
project_id = "sample-project-123"
location = "us-central1"

# LLM Agentの名前とセッションIDを設定
app_name = "gemini_flash_agent_app"
username = "user_1"
session_id = "session_1"

# Vertex AIを使用するための環境変数を設定
os.environ["GOOGLE_CLOUD_PROJECT"] = project_id
os.environ["GOOGLE_CLOUD_LOCATION"] = location
os.environ["GOOGLE_GENAI_USE_VERTEXAI"] = "True"

vertexai.init(
    project=project_id,
    location=location,
    staging_bucket=f"gs://{project_id}",
)

# LLM Agentを作成する
root_agent = LlmAgent(
    name="gemini_flash_agent",
    description="This is a sample agent",
    model="gemini-2.0-flash",
    instruction="You are a great assistant",
)

remote_app = agent_engines.create(
    agent_engine=root_agent, requirements=["google-cloud-aiplatform[adk,agent_engines]"]
)

print(f"Remote app created: {remote_app.resource_name}")
セッション内に会話履歴を生成
import os

import vertexai
from google.adk.agents import (
    LlmAgent,
)
from vertexai import agent_engines

# GCPプロジェクトIDとロケーションを設定
project_id = "sample-project-123"
location = "us-central1"

# LLM Agentの名前とセッションIDを設定
app_name = "gemini_flash_agent_app"

# <https://console.cloud.google.com/vertex-ai/agents/locations/us-central1/agent-engines/3219396434407194624/sessions?hl=ja&inv=1&invt=Ab3UnA&project=sample-project-123>
username = "user_1"
session_id = "7306477417676144640"

RESOURCE_ID = (
    "projects/xxxxxxxxxx/locations/us-central1/reasoningEngines/3219396434407194624"
)

remote_app = agent_engines.get(RESOURCE_ID)
# remote_session = remote_app.create_session(user_id=username)

remote_session = remote_app.create_session(user_id=username)

def run_agent(query: str):
    for event in remote_app.stream_query(
        user_id=username,
        session_id=remote_session["id"],
        message=query,
    ):
        print("Agent Response: ", event["content"]["parts"][0]["text"])

if __name__ == "__main__":
    prompt = input(">")

    while prompt.lower() != "exit":
        run_agent(prompt)
        prompt = input(">")
"""
>こんにちは
Agent Response: こんにちは!何かお手伝いできることはありますか?
>あなたは誰ですか?
Agent Response: 私は、Google によってトレーニングされた、大規模言語モデルです。
>私はヒデイチです。
Agent Response: ヒデイチさん、こんにちは!お会いできて嬉しいです。何かお手伝いできることはありますか?
>私をパーソナライズする質問をしてみて
Agent Response: 承知しました。ヒデイチさんをより良く知るための質問をいくつかさせてください。
1. ヒデイチさんの興味や趣味は何ですか? (例: 読書、映画鑑賞、スポーツ、料理など)
2. ヒデイチさんはどんなお仕事をされていますか? (差し支えなければ、職種や業界など)
3. ヒデイチさんが今日一番楽しみにしていることは何ですか?
4. ヒデイチさんが最近学んだ面白いことはありますか?
これらの質問を通して、ヒデイチさんについてもっと知ることができれば幸いです。もちろん、答えられる範囲で構いません。
>1. 旅行とかコーヒーが特に好きかな! 2. IT企業に勤めています! 3. 彼女さんの手作りディナー 4. Kubernetesとか!
Agent Response: ヒデイチさん、教えていただきありがとうございます!旅行とコーヒーがお好きで、IT企業にお勤め、そしてKubernetesに興味があるのですね。
旅行がお好きとのことですが、今までで一番印象に残っている旅行先はどこですか?また、どんな種類のコーヒーがお好みですか?
Kubernetesについては、現在どのようなことに取り組んでいらっしゃるのでしょうか?もし何か具体的な質問があれば、私にできる範囲でお答えします。
>exit
"""セッションから記憶を生成
import vertexai

# GCPプロジェクトIDとロケーションを設定
project_id = "sample-project-123"
location = "us-central1"

# LLM Agentの名前とセッションIDを設定
app_name = "gemini_flash_agent_app"
username = "user_1"
session_id = "session_1"

# <https://console.cloud.google.com/vertex-ai/agents/locations/us-central1/agent-engines/3219396434407194624/sessions?hl=ja&inv=1&invt=Ab3UnA&project=sample-project-123>
username = "user_1"
session_id = "7306477417676144640"
resource_id = "projects/sample-project-123/locations/us-central1/reasoningEngines/3219396434407194624"

client = vertexai.Client(
    project=project_id,
    location=location,
)

from google.cloud import aiplatform_v1beta1

sessions_client = aiplatform_v1beta1.SessionServiceClient(
    client_options={"api_endpoint": f"https://{location}-aiplatform.googleapis.com"},
    transport="rest",
)

session_list = sessions_client.list_sessions(parent=resource_id)
print(session_list)
# Create a client
"""
ListSessionsPager<sessions {
  name: "projects/xxxxxxxxxx/locations/us-central1/reasoningEngines/3219396434407194624/sessions/7306477417676144640"
  create_time {
    seconds: 1753077359
    nanos: 521283000
  }
"""

raw_session_name = "projects/xxxxxxxxxx/locations/us-central1/reasoningEngines/3219396434407194624/sessions/7306477417676144640"
session_name = "/".join(raw_session_name.split("/")[0:-2])
print("session_name: ", session_name)
session = sessions_client.get_session(name=raw_session_name)

print("session.name: ", session.name)

client.agent_engines.generate_memories(
    name=resource_id,
    vertex_session_source={"session": session.name},
    # Optional when using Agent Engine Sessions. Defaults to {"user_id": session.user_id}.
)
記憶一覧
import vertexai

# GCPプロジェクトIDとロケーションを設定
project_id = "sample-project-123"
location = "us-central1"

# LLM Agentの名前とセッションIDを設定
app_name = "gemini_flash_agent_app"
username = "user_1"
session_id = "session_1"

# <https://console.cloud.google.com/vertex-ai/agents/locations/us-central1/agent-engines/3219396434407194624/sessions?hl=ja&inv=1&invt=Ab3UnA&project=sample-project-123>
username = "user_1"
session_id = "7306477417676144640"
resource_id = "projects/sample-project-123/locations/us-central1/reasoningEngines/3219396434407194624"

client = vertexai.Client(
    project=project_id,
    location=location,
)

pager = client.agent_engines.list_memories(name=resource_id)
for page in pager:
    print(page)
生成されたメモリ。個人の嗜好や興味を記憶している事がわかります。
python 004-list_memory.py
/root/workdir/agent_memory/004-list_memory.py:24: ExperimentalWarning: The Vertex SDK GenAI agent engines module is experimental, and may change in future versions.
  pager = client.agent_engines.list_memories(name=resource_id)
create_time=datetime.datetime(2025, 7, 21, 6, 59, 12, 564399, tzinfo=TzInfo(UTC)) description=None display_name=None fact='I work at an IT company.' name='projects/xxxxxxxxxx/locations/us-central1/reasoningEngines/3219396434407194624/memories/572058857501622272' scope={'user_id': 'user_1'} update_time=datetime.datetime(2025, 7, 21, 6, 59, 12, 564399, tzinfo=TzInfo(UTC))
create_time=datetime.datetime(2025, 7, 21, 6, 59, 12, 564399, tzinfo=TzInfo(UTC)) description=None display_name=None fact='I am interested in Kubernetes.' name='projects/xxxxxxxxxx/locations/us-central1/reasoningEngines/3219396434407194624/memories/5183744875929010176' scope={'user_id': 'user_1'} update_time=datetime.datetime(2025, 7, 21, 6, 59, 12, 564399, tzinfo=TzInfo(UTC))
create_time=datetime.datetime(2025, 7, 21, 6, 59, 12, 564399, tzinfo=TzInfo(UTC)) description=None display_name=None fact='I like traveling and coffee.' name='projects/xxxxxxxxxx/locations/us-central1/reasoningEngines/3219396434407194624/memories/8930739765901262848' scope={'user_id': 'user_1'} update_time=datetime.datetime(2025, 7, 21, 6, 59, 12, 564399, tzinfo=TzInfo(UTC))
Agent Engine上のセッションに自動でMemoryを生成(docs)
自動メモリ生成をトリガー
import vertexai

# GCPプロジェクトIDとロケーションを設定
project_id = "sample-project-123"
location = "us-central1"

# LLM Agentの名前とセッションIDを設定
username = "user_1"

# <https://console.cloud.google.com/vertex-ai/agents/locations/us-central1/agent-engines/3219396434407194624/sessions?hl=ja&inv=1&invt=Ab3UnA&project=sample-project-123>
username = "user_1"
resource_id = "projects/sample-project-123/locations/us-central1/reasoningEngines/7690556070711787520"
session_id = "6241226572221644800"

client = vertexai.Client(
    project=project_id,
    location=location,
)

client.agent_engines.generate_memories(
    name=resource_id,
    vertex_session_source={
        "session": f"{resource_id}/sessions/{session_id}",
    },
    # Optional when using Agent Engine Sessions. Defaults to {"user_id": session.user_id}.
    # scope=SCOPE,
    config={"wait_for_completion": True},
)
このAgentに対して会話を行う(省略)
会話終了後、一定時間経過後にメモリが生成されます。
create_time=datetime.datetime(2025, 7, 29, 22, 38, 12, 921691, tzinfo=TzInfo(UTC)) description=None display_name=None fact='I like 25 degrees.' name='projects/xxxxxxxxxx/locations/us-central1/reasoningEngines/7690556070711787520/memories/2559278790148620288' scope={'user_id': 'user_1'} update_time=datetime.datetime(2025, 7, 29, 22, 39, 56, 26318, tzinfo=TzInfo(UTC))
手動でメモリをアップロード(docs)
以下を実行する事で任意の内容のメモリをアップロードする事ができます。
import vertexai

# GCPプロジェクトIDとロケーションを設定
project_id = "sample-project-123"
location = "us-central1"

# LLM Agentの名前とセッションIDを設定
app_name = "gemini_flash_agent_app"
session_id = "session_1"
user_id = "user_1"

# <https://console.cloud.google.com/vertex-ai/agents/locations/us-central1/agent-engines/3219396434407194624/sessions?hl=ja&inv=1&invt=Ab3UnA&project=sample-project-123>
resource_id = "projects/sample-project-123/locations/us-central1/reasoningEngines/7690556070711787520"

client = vertexai.Client(
    project=project_id,
    location=location,
)

client.agent_engines.create_memory(
    name=resource_id, fact="I'm a God.", scope={"user_id": user_id}
)

pager = client.agent_engines.list_memories(name=resource_id)
for page in pager:
    print(page)

root@05c697e7b3e5:~/workdir/agent_memory# python 005-upload_memory.py
/root/workdir/agent_memory/005-upload_memory.py:21: ExperimentalWarning: The Vertex SDK GenAI agent engines module is experimental, and may change in future versions.
  client.agent_engines.create_memory(
create_time=datetime.datetime(2025, 7, 29, 11, 36, 6, 120797, tzinfo=TzInfo(UTC)) description=None display_name=None fact="I'm a God." name='projects/xxxxxxxxxx/locations/us-central1/reasoningEngines/7690556070711787520/memories/2997640882003378176' scope={'user_id': 'user_1'} update_time=datetime.datetime(2025, 7, 29, 11, 36, 6, 120797, tzinfo=TzInfo(UTC))
create_time=datetime.datetime(2025, 7, 29, 11, 36, 56, 26817, tzinfo=TzInfo(UTC)) description=None display_name=None fact="I'm a God." name='projects/xxxxxxxxxx/locations/us-central1/reasoningEngines/7690556070711787520/memories/6029689331130564608' scope={'user_id': 'user_1'} update_time=datetime.datetime(2025, 7, 29, 11, 36, 56, 26817, tzinfo=TzInfo(UTC))
5. Agent EngineにおけるObservability
LLMの振る舞いはブラックボックスになりがちです。特にLLMを複数組み合わせたmulti-agentアーキテクチャでは、各エージェントが独立した思考ループを持ち、メッセージを相互交差させながらタスクを解決します。そのため、
- ステップ数が単独エージェントより桁違いに増える
- 失敗ポイントがネットワーク状に拡散する
- 生成コストと遅延が雪だるま式に膨らむ
といった特徴を持ちます。ブラックボックスのまま運用すると、「どこで誤推論が起き、どのAPIが詰まり、どのエージェントが費用を消費しているのか」を特定できません。だからこそ、Observabilityを開発初期から組み込むことが、multi-agentの信頼性・コスト・品質を守る生命線となります。ここでは、Agent EngineにおけるエージェントのObservabilityについて整理します。
A. Cloud TraceまたはAgentOps
- Cloud Traceでは、時系列中心の可視化を通してAgentの振る舞いやツールの使用有無を包括的に把握できます。また、ユーザIDと紐づくSession IDが各トレースに関連付けられており、意図しない操作が行われた際には、ユーザのメッセージに基づいてどのように動作したかを監査する資料となります。
- 一方、他のSaaS(例:AgentOps)は、Cloud Traceと同等の機能に加えて、LLMプロンプト・レスポンス、トークン数、ツール利用状況をリッチに可視化します。ユースケースとしては、Agentを管理する部門向けに導入し、コストや利用率を可視化することが挙げられます。
| 観点 | Cloud Trace | AgentOps |
|---|---|---|
| 基盤/Agent Engineでの利用 | ⚪︎ | ⚪︎ |
| 基盤/他基盤での利用 | × | ⚪︎ |
| ベンダーロックイン | Google Cloudネイティブ(GCPプロジェクトが必須) | AgentOps SaaS(APIキー)依存 |
| セットアップ手順 | Python SDKでAgent Engineデプロイ時にenable_tracing=Trueを指定する必要あり | 1. AgentOpsの利用登録 2. pip install agentops ➜ agentops.init()とAPIキー設定で完了 |
| トレーシング方式 | ADKが発行する標準OpenTelemetryスパンをそのままCloud Traceにエクスポート。invocation, agent_run, call_llm, execute_toolなどの基本スパンを提供 | 独自ラッパーでADKのOpenTelemetryを無効化し、AgentOpsが階層的スパンを生成。LLM/ツール呼び出しも自動捕捉(参考) |
| 標準準拠 | OpenTelemetry完全準拠 | AgentOps独自実装(内部でOTelをパッチ) |
| 可視化/ダッシュボード | Trace Explorerでヒートマップ/ウォーターフォール。スパン属性と時系列での可視化が中心 | エージェント実行フロー、LLMプロンプト・レスポンス、トークン数、ツールI/Oをリッチ表示。セッションリプレイ対応 |
| LLMコスト&レイテンシ計測 | スパン遅延は測定可。トークン課金やLLMコストは未対応 | トークン数ベースで400以上のモデル料金を自動計算し表示 |
| 料金体系 | 無料枠250万スパン/月。超過分$0.20/100万スパン。App Engine/Cloud Runなどの自動スパンは無料(参考) | 公式ページのPricing Calculatorより: – ライセンス付与メンバー数(1席/月あたり40ドル) – 月間スパンアップロード数(最初の10万件までは無料。その後は1,000スパンごとに0.10ドル) – 月間APIトークン数(100万トークンあたり0.20ドル) |
| 主なユースケース | – GCP環境で軽量トレーシングを導入したい – OTel標準とGoogle Cloudサービスの統合 – スパン量が多い大規模システムでコスト効率を重視 | – エージェント開発の詳細な可観測性が必要 – LLMコスト最適化/セッションリプレイ – マルチエージェントや複雑フローのデバッグ |
| 可視性・閲覧権限 | IAMによる制御(参照) | アカウント発行&APIキー保有者のみ。エンタープライズ仕様は不明 |
B. Cloud Trace
Cloud Traceとは
Google Cloud Traceは、Agentの監視・デバッグ・パフォーマンス改善を行うためのツールです。包括的なトレースにより、リクエストがエージェント間をどのように流れるかを理解し、AIエージェント内のボトルネックやエラーを特定できます。
使い方
ADK製のAgentはCloud Traceとの互換性があります(Agent Observability with Cloud Trace)。AdkApp作成時にenable_tracing=Trueを指定することで、Agent Engine上でも連携が可能です。
adk_app = reasoning_engines.AdkApp(
    agent=root_agent,
    enable_tracing=True, # これを付与してdeployするだけ
)

name = f"hideichi_cloud_trace_test_{uuid.uuid4()}"
print(f"Creating remote app with name: {name}")
remote_app = agent_engines.create(
    agent_engine=adk_app,
    requirements=[
        "google-cloud-aiplatform[adk,agent_engines]",
        "cloudpickle==3",
        "google-cloud-logging",
    ],
    display_name=name,
    description="cloud traceの検証",
)
print(f"Remote app created: {remote_app.resource_name}")
デプロイ後にAgentを使用すると、以下のTraceが出力されます。
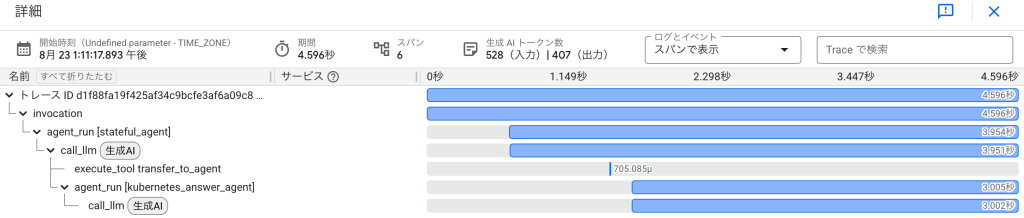
call_llmでは具体的に以下の項目が取得されます。
- g.co/agent: OpenTelemetryエージェント実装とTrace Exporterのバージョン情報
- gcp.vertex.agent.event_id: Vertex AI Agentが発行する1イベント単位の一意ID
- gcp.vertex.agent.invocation_id: エージェント呼び出し単位の一意ID
- gcp.vertex.agent.llm_request: LLMへのリクエストJSONペイロード
- gcp.vertex.agent.llm_response: LLMからのレスポンスJSONペイロード
- gcp.vertex.agent.session_id: 会話セッション全体を識別するID(ユーザと紐づく)
- gen_ai.request.model: 使用した生成AIモデル名
- gen_ai.response.finish_reasons: レスポンス終了理由(stop/lengthなど)
- gen_ai.system: 呼び出し元システム識別子(ここではgcp.vertex.agent)
- gen_ai.usage.input_tokens: プロンプトで消費したトークン数
- gen_ai.usage.output_tokens: 生成で消費したトークン数
C. AgentOps
AgentOpsとは
AgentOpsは、AIエージェントおよびLLMアプリケーションの開発・運用・監視・最適化を包括的に支援するプラットフォームです。
使い方
1. AgentOpsに登録します。
2. APIキーを発行し、以下をAgentのコード冒頭に記載します。
import agentops

agentops.init(
    api_key="",
    default_tags=["gen-ai-lab", "adk", "agentops"],
)
3. Agentが実行されると、AgentOpsに情報が自動的に送信されます。
補足:
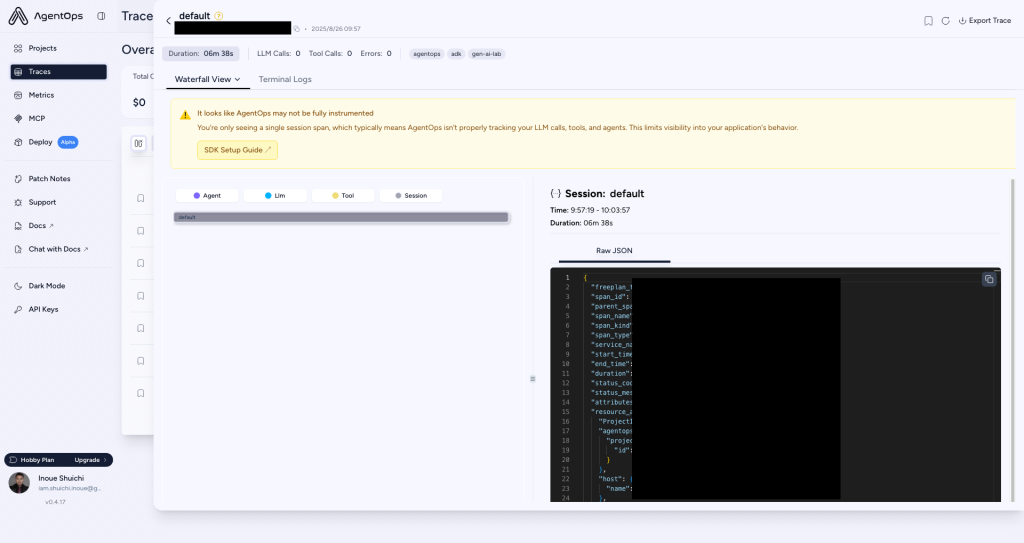
本来であれば、Cloud Traceの様な図が出力されるはずですが、Blog執筆時の調査では、フローが可視化する事ができませんでした。今後のアップデートで修正されると考えられます。
6. AgentEngineで使えるAIフレームワーク
A. 概要
VertexAIAgentEngineを使用するには、まずVertexAIAgentEngineにデプロイできるエージェントを開発する必要があります。エージェントを開発する最も簡単な方法は、提供されているフレームワーク固有のテンプレートを使用することです。フレームワーク固有のテンプレートは、オブジェクトのシリアル化や、エージェントを初期化するコードとプロンプトに応答するコードの分離など、エージェント開発の一般的な側面の一部を自動的に処理します。以下のフレームワーク固有のテンプレートが用意されています。
| Framework | 説明 |
|---|---|
| Agent Development Kit | Googleの内部ベストプラクティスに基づいて設計され、AIアプリケーションを構築する開発者や、堅牢なエージェントベースのソリューションを迅速にプロトタイプ化・展開する必要があるチーム向け。 |
| Agent2Agent (preview) | Agent2Agent (A2A)プロトコルは、AIエージェント間のシームレスな通信と協調を可能にするために設計されたオープンスタンダード。 |
| LangChain | 事前定義された構成と抽象化により、基本的なユースケースの実装が容易。 |
| LangGraph | ワークフローをグラフベースで定義し、高度な人間参加(human-in-the-loop)や巻き戻し・再実行(rewind/replay)機能を備える。 |
| AG2 (formerly AutoGen) | AG2は、LLMワークフローを構築するための高水準抽象化として、マルチエージェント会話フレームワークを提供。 |
| LlamaIndex (preview) | LlamaIndexのクエリパイプラインは、RAGワークフローを作成するための高水準インターフェースを提供。 |
本章では、LangChain、LangGraphをAgentEngineで利用する際のTIPSを示します。AgentDevelopmentKitについては、過去記事「Agent Development KitとAgent Engineを使ってVertex AI Agent Builderに入門してみる」を参照してください。
B. LangChain
概要:
LangChainは、LLMと外部データ/ツールを“チェーン”という概念で結び付け、チャットボットやRAGアプリなどを短いコードで構築できるOSSライブラリです。
AgentEngineを主とする場合の開発方法:
開発やデプロイ方法は、ADKと同じ流れです。
## memo
# pip install -U langchain-google-vertexai langchain

from vertexai.agent_engines._agent_engines import AgentEngine
from vertexai.preview.reasoning_engines import LangchainAgent
from langchain_google_vertexai import HarmBlockThreshold, HarmCategory
import uuid
import vertexai
from langchain_google_firestore import FirestoreChatMessageHistory
from google.cloud import firestore

## setup GCP project
project_id = "sample-project-123"
location = "us-central1"

vertexai.init(
    project=project_id,
    location=location,
    staging_bucket=f"gs://{project_id}",
)

## setup <https://cloud.google.com/vertex-ai/generative-ai/docs/agent-engine/develop/langchain?hl=ja#model>
model = "gemini-2.0-flash"

safety_settings = {
    HarmCategory.HARM_CATEGORY_UNSPECIFIED: HarmBlockThreshold.BLOCK_NONE,
    HarmCategory.HARM_CATEGORY_DANGEROUS_CONTENT: HarmBlockThreshold.BLOCK_MEDIUM_AND_ABOVE,
    HarmCategory.HARM_CATEGORY_HATE_SPEECH: HarmBlockThreshold.BLOCK_ONLY_HIGH,
    HarmCategory.HARM_CATEGORY_HARASSMENT: HarmBlockThreshold.BLOCK_LOW_AND_ABOVE,
    HarmCategory.HARM_CATEGORY_SEXUALLY_EXPLICIT: HarmBlockThreshold.BLOCK_NONE,
}

model_kwargs = {
    # temperature (float): The sampling temperature controls the degree of
    # randomness in token selection.
    "temperature": 0.28,
    # max_output_tokens (int): The token limit determines the maximum amount of
    # text output from one prompt.
    "max_output_tokens": 1000,
    # top_p (float): Tokens are selected from most probable to least until
    # the sum of their probabilities equals the top-p value.
    "top_p": 0.95,
    # top_k (int): The next token is selected from among the top-k most
    # probable tokens. This is not supported by all model versions. See
    # <https://cloud.google.com/vertex-ai/generative-ai/docs/multimodal/image-understanding#valid_parameter_values>
    # for details.
    "top_k": None,
    # safety_settings (Dict[HarmCategory, HarmBlockThreshold]): The safety
    # settings to use for generating content.
    # (you must create your safety settings using the previous step first).
    "safety_settings": safety_settings,
}

## create agent

agent = LangchainAgent(
    model=model,
    model_kwargs=model_kwargs,
)

## test local agent
response = agent.query(input="Hi.")

print(response)

## Deploy to Agent Engine
### Requirements for agent. If you use extra lib for agent, please add them here.
requirements = ["google-cloud-aiplatform[agent_engines,langchain]"]

### You can include local files or directories containing the necessary local Python source files. <https://cloud.google.com/vertex-ai/generative-ai/docs/agent-engine/deploy?hl=ja#extra-packages>
extra_packages = None

### Staging artifacts are overwritten if they correspond to an existing folder in a Cloud Storage bucket. If necessary, you can specify the Cloud Storage folder for the staging artifacts. <https://cloud.google.com/vertex-ai/generative-ai/docs/agent-engine/deploy#gcs-directory>

gcs_dir_name = "hideichi-test/" + str(uuid.uuid4())

### Deploy agent into agent engine
def deploy_agent(
    agent,
    requirements: list[str],
    extra_packages: list[str] | None = None,
    gcs_dir_name: str | None = None,
) -> AgentEngine:
    from vertexai import agent_engines

    remote_agent = agent_engines.create(
        agent,
        requirements=requirements,
        extra_packages=extra_packages,
        gcs_dir_name=gcs_dir_name,
        display_name=f"hideichi_agent_{uuid.uuid4()}",
        description="検証中です。検証完了後、まとめて削除します",
    )

    print(f"Remote app created: {remote_agent.resource_name}")

    return remote_agent

remote_agent = deploy_agent(
    agent,
    requirements=requirements,
    extra_packages=extra_packages,
    gcs_dir_name=gcs_dir_name,
)

## Query deployed agent
print(
    remote_agent.query(input="こんにちは、私は秀一です。あなたの名前は何ですか?"),
)
ただし、ADKと同様なフルマネージドなSessionは利用できません。ADKの様にビルドインで使うことはできず、別途導入が必要です(docs)。ConsoleのSessionにも表示されません。また、Memory機能もADKと同様には動かず別途導入が必要です。
会話履歴の永続化のための選択肢として、以下の三つが用意されています。
Firestoreを使用する例:
## memo
# pip install -U \\
#     "langchain-google-vertexai" \\
#     "langchain" \\
#     "langchain-google-firestore" \\
#     "google-cloud-firestore" \\
#     "langchain-google-bigtable"

from time import sleep
from agentops import session
from vertexai.agent_engines._agent_engines import AgentEngine
from vertexai.preview.reasoning_engines import LangchainAgent
from langchain_google_vertexai import HarmBlockThreshold, HarmCategory
import uuid
import vertexai
from langchain_google_firestore import FirestoreChatMessageHistory
from google.cloud import firestore

## setup GCP project
project_id = "sample-project-123"
location = "us-central1"

vertexai.init(
    project=project_id,
    location=location,
    staging_bucket=f"gs://{project_id}",
)

## setup <https://cloud.google.com/vertex-ai/generative-ai/docs/agent-engine/develop/langchain?hl=ja#model>
model = "gemini-2.0-flash"

safety_settings = {
    HarmCategory.HARM_CATEGORY_UNSPECIFIED: HarmBlockThreshold.BLOCK_NONE,
    HarmCategory.HARM_CATEGORY_DANGEROUS_CONTENT: HarmBlockThreshold.BLOCK_MEDIUM_AND_ABOVE,
    HarmCategory.HARM_CATEGORY_HATE_SPEECH: HarmBlockThreshold.BLOCK_ONLY_HIGH,
    HarmCategory.HARM_CATEGORY_HARASSMENT: HarmBlockThreshold.BLOCK_LOW_AND_ABOVE,
    HarmCategory.HARM_CATEGORY_SEXUALLY_EXPLICIT: HarmBlockThreshold.BLOCK_NONE,
}

model_kwargs = {
    # temperature (float): The sampling temperature controls the degree of
    # randomness in token selection.
    "temperature": 0.28,
    # max_output_tokens (int): The token limit determines the maximum amount of
    # text output from one prompt.
    "max_output_tokens": 1000,
    # top_p (float): Tokens are selected from most probable to least until
    # the sum of their probabilities equals the top-p value.
    "top_p": 0.95,
    # top_k (int): The next token is selected from among the top-k most
    # probable tokens. This is not supported by all model versions. See
    # <https://cloud.google.com/vertex-ai/generative-ai/docs/multimodal/image-understanding#valid_parameter_values>
    # for details.
    "top_k": None,
    # safety_settings (Dict[HarmCategory, HarmBlockThreshold]): The safety
    # settings to use for generating content.
    # (you must create your safety settings using the previous step first).
    "safety_settings": safety_settings,
}

## Store chat history
session_id = str(uuid.uuid4())
print(f"session_id: {session_id}")

def get_session_history(session_id: str):
    client = firestore.Client(project=project_id)
    return FirestoreChatMessageHistory(
        client=client,
        session_id=session_id,
        # collection="(default)", # db idを指定しない場合はデフォルトが利用される
        encode_message=False,
    )

## create agent

agent = LangchainAgent(
    model=model,
    model_kwargs=model_kwargs,
    chat_history=get_session_history,
)

## test local agent
response = agent.query(
    input="Hi.",
    config={"configurable": {"session_id": session_id}},
)

print(response)

## Deploy to Agent Engine
### Requirements for agent. If you use extra lib for agent, please add them here.
requirements = [
    "google-cloud-aiplatform[agent_engines,langchain]",
    "langchain-google-firestore",
    "google-cloud-firestore",
]

### You can include local files or directories containing the necessary local Python source files. <https://cloud.google.com/vertex-ai/generative-ai/docs/agent-engine/deploy?hl=ja#extra-packages>
extra_packages = None

### Staging artifacts are overwritten if they correspond to an existing folder in a Cloud Storage bucket. If necessary, you can specify the Cloud Storage folder for the staging artifacts. <https://cloud.google.com/vertex-ai/generative-ai/docs/agent-engine/deploy#gcs-directory>

gcs_dir_name = "hideichi-test/" + str(uuid.uuid4())

### Deploy agent into agent engine
def deploy_agent(
    agent,
    requirements: list[str],
    extra_packages: list[str] | None = None,
    gcs_dir_name: str | None = None,
) -> AgentEngine:
    from vertexai import agent_engines

    remote_agent = agent_engines.create(
        agent,
        requirements=requirements,
        extra_packages=extra_packages,
        gcs_dir_name=gcs_dir_name,
        display_name=f"hideichi_agent_{uuid.uuid4()}",
        description="検証中です。検証完了後、まとめて削除します",
    )

    print(f"Remote app created: {remote_agent.resource_name}")

    return remote_agent

remote_agent = deploy_agent(
    agent,
    requirements=requirements,
    extra_packages=extra_packages,
    gcs_dir_name=gcs_dir_name,
)

## Query deployed agent
print(
    remote_agent.query(
        input="こんにちは、私は秀一です。あなたの名前は何ですか?",
        config={"configurable": {"session_id": session_id}},
    ),
)

print(
    remote_agent.query(
        input="私の名前を知っていますか?",
        config={"configurable": {"session_id": session_id}},
    ),
)
C. LangGraph
概要
LangGraphは、LLMエージェントのワークフローをグラフとして宣言的に記述・実行できるオーケストレーションフレームワークです。複数エージェントの協調やループ処理、条件分岐、ストリーミング出力、人間による承認フローなどを、状態を持つグラフ構造で表現し、長時間・複雑な対話やタスクを安定的に走らせることを目指しています。
デプロイ方法は、ADKと同じ流れです。こちらも、ADKと同様なフルマネージドなSessionは利用できません。ADKの様にビルドインで使うことはできず、別途導入が必要です(docs)。
選択肢として以下の二つが用意されています。
AgentEngineを主とする場合の開発方法:
開発やデプロイ方法は、ADKと同じ流れです。しかし、ADKと同じようなフルマネージドなSessionは利用できません。ADKの様にビルドインで使うことはできず、別途導入が必要です(docs)。
選択肢として以下の二つが用意されています。
開発者は事前にDBを作成し、AgentまたはAgentEngineに対してテーブルを作成する権限が付与されている必要があります。
## memo
# pip install -U langchain-google-vertexai langgraph langchain_google_cloud_sql_pg
# This-is-test-123
from vertexai.agent_engines._agent_engines import AgentEngine
from langchain_google_vertexai import HarmBlockThreshold, HarmCategory
import uuid
import vertexai
from langchain_google_firestore import FirestoreChatMessageHistory
from google.cloud import firestore

## setup GCP project
project_id = "sample-project-123"
location = "us-central1"

vertexai.init(
    project=project_id,
    location=location,
    staging_bucket=f"gs://{project_id}",
)

## setup <https://cloud.google.com/vertex-ai/generative-ai/docs/agent-engine/develop/langchain?hl=ja#model>
model = "gemini-2.0-flash"

safety_settings = {
    HarmCategory.HARM_CATEGORY_UNSPECIFIED: HarmBlockThreshold.BLOCK_NONE,
    HarmCategory.HARM_CATEGORY_DANGEROUS_CONTENT: HarmBlockThreshold.BLOCK_MEDIUM_AND_ABOVE,
    HarmCategory.HARM_CATEGORY_HATE_SPEECH: HarmBlockThreshold.BLOCK_ONLY_HIGH,
    HarmCategory.HARM_CATEGORY_HARASSMENT: HarmBlockThreshold.BLOCK_LOW_AND_ABOVE,
    HarmCategory.HARM_CATEGORY_SEXUALLY_EXPLICIT: HarmBlockThreshold.BLOCK_NONE,
}

model_kwargs = {
    # temperature (float): The sampling temperature controls the degree of
    # randomness in token selection.
    "temperature": 0.28,
    # max_output_tokens (int): The token limit determines the maximum amount of
    # text output from one prompt.
    "max_output_tokens": 1000,
    # top_p (float): Tokens are selected from most probable to least until
    # the sum of their probabilities equals the top-p value.
    "top_p": 0.95,
    # top_k (int): The next token is selected from among the top-k most
    # probable tokens. This is not supported by all model versions. See
    # <https://cloud.google.com/vertex-ai/generative-ai/docs/multimodal/image-understanding#valid_parameter_values>
    # for details.
    "top_k": None,
    # safety_settings (Dict[HarmCategory, HarmBlockThreshold]): The safety
    # settings to use for generating content.
    # (you must create your safety settings using the previous step first).
    "safety_settings": safety_settings,
}

## checkpoint (conversation history) setup
checkpointer_kwargs = {
    "project_id": project_id,
    "region": location,
    "instance": "hideichi-agent-engine-agent-test",  # ここは適宜変えてもらう.
    "database": "hideichi-agent-engine-agent-test-db",  # ここは適宜変えてもらう
    "user": "postgres",  # Avoid hardcoding passwords in production code
    "password": "This-is-test-123",  # Avoid hardcoding passwords in production code
}

def checkpointer_builder(kwargs):
    from langchain_google_cloud_sql_pg import (
        PostgresEngine,
        PostgresSaver,
    )

    engine = PostgresEngine.from_instance(kwargs)

    # This is need for the first time only.
    # engine.init_checkpoint_table()

    return PostgresSaver.create_sync(engine)

## create agent

from vertexai import agent_engines

agent = agent_engines.LanggraphAgent(
    model=model,  # Required.
    model_kwargs=model_kwargs,  # Optional.
    checkpointer_kwargs=checkpointer_kwargs,  # Optional, chat history
    checkpointer_builder=checkpointer_builder,  # Optional, chat history
)

## decide session_id
session_id = str(uuid.uuid4())

## test local agent
def local_agent_query(session_id: str, query: str):
    response = agent.query(
        input={
            "messages": [
                ("user", "Hi. I'm Hideichi."),
            ]
        },
        config={"configurable": {"thread_id": session_id}},
    )

    print(response)

local_agent_query(session_id, "Hi. I'm Hideichi.")
local_agent_query(session_id, "What's my name?")

## Deploy to Agent Engine
### Requirements for agent. If you use extra lib for agent, please add them here.
requirements = [
    "google-cloud-aiplatform[agent_engines]",
    "langchain_google_cloud_sql_pg==0.14.1",
    "langgraph==0.6.7",
    "langchain-google-vertexai==2.0.28",
    "langchain==0.3.27"
]

### You can include local files or directories containing the necessary local Python source files. <https://cloud.google.com/vertex-ai/generative-ai/docs/agent-engine/deploy?hl=ja#extra-packages>
extra_packages = None

### Staging artifacts are overwritten if they correspond to an existing folder in a Cloud Storage bucket. If necessary, you can specify the Cloud Storage folder for the staging artifacts. <https://cloud.google.com/vertex-ai/generative-ai/docs/agent-engine/deploy#gcs-directory>

gcs_dir_name = "hideichi-test/" + str(uuid.uuid4())

### Deploy agent into agent engine
def deploy_agent(
    agent,
    requirements: list[str],
    extra_packages: list[str] | None = None,
    gcs_dir_name: str | None = None,
) -> AgentEngine:
    from vertexai import agent_engines

    remote_agent = agent_engines.create(
        agent,
        requirements=requirements,
        extra_packages=extra_packages,
        gcs_dir_name=gcs_dir_name,
        display_name=f"hideichi_agent_{uuid.uuid4()}",
        description="検証中です。検証完了後、まとめて削除します",
    )

    print(f"Remote app created: {remote_agent.resource_name}")

    return remote_agent

remote_agent = deploy_agent(
    agent,
    requirements=requirements,
    extra_packages=extra_packages,
    gcs_dir_name=gcs_dir_name,
)

## Query deployed agent
print(
    remote_agent.query(
        input={
            "messages": [
                ("user", "Hi. Who am I?"),
            ]
        },
        config={"configurable": {"thread_id": session_id}},
    )
)
D. AgentEngineを利用する上で、外部DBを運用する際の観点
概要:
生成AIエージェントを本番運用するうえで、会話履歴やメモリをどこに永続化するかは重要な設計ポイントです。VertexAIAgentEngineには以下のRate Limitingという前提があるため、外部DBの性能要件は想像以上に緩やかになります。
Rate Limiting:
- 1分間あたり90リクエストが上限(QueryとStreamQueryの合算)。
- 同時双方向接続(BidiStreamQuery)は10本/分。
- そもそもアプリ側のスループットがこの数値に収まるため、DB側の読み書きがボトルネックになる可能性は低いです。
このRate Limitingを頭に入れると、FirestoreでもCloudSQLでも「オーバースペック」気味になるケースが多いことがわかります。
7. Agent EngineにおけるAgentの評価方法
A. 概要
LLMエージェントのテストは、従来のソフトウェア開発におけるテストとは異なるアプローチが求められます。モデルの確率的な性質により確定的な「成功/失敗」での評価は難しく、最終的な出力だけでなく、そこに至るまでの思考プロセス(軌跡)を質的に評価することが重要になります。しかしながら、Agent Engineにおいてエージェントを評価するための統一されたフレームワークは、2025年9月15日時点で存在しません。また、それぞれのAgentにおける中間出力や最終出力のフォーマットは規格化されていません。したがって、最終的な評価指標に落とし込むために、各Agentごとに評価指標を導出するための評価手法を用意し、CIに組み込む必要があります。
B. 評価の例(参考)
以下に、エージェントのテストを実施するための主要なステップと考慮事項を示します。
評価の準備
本格的な評価を始める前に、明確な目標と成功基準を定義することが推奨されます。
- 成功の定義: エージェントにとって何が成功した状態かを具体的に定義します。
- 重要なタスクの特定: エージェントが必ず達成しなければならないタスクを洗い出します。
- 関連指標の選択: パフォーマンスを測定するために追跡する指標を決定します。
評価対象
エージェントの評価は、主に2つの要素に分けられます。
- 軌跡(Trajectory)とツールの使用の評価:
エージェントがユーザーに応答するまでに行った一連のアクション(ツール呼び出し、戦略、効率性など)を評価します。期待される理想的な手順と比較することで、エラーや非効率な点を明らかにします。 - 最終的な応答の評価:
エージェントが生成した最終的な出力の品質、関連性、正確性を評価します。
評価指標
- 軌跡の評価指標:
エージェントがたどったツール呼び出しの順序を、期待される順序と比較して評価します。- 完全一致(Exact match): 期待される軌跡と完全に一致する場合にスコアを与えます。
- 順序一致(In-order match): 余分なステップがあっても、期待されるツール呼び出しが正しい順序で含まれているかを評価します。
- 順序を問わない一致(Any-order match): 順序に関わらず、期待されるツール呼び出しがすべて含まれているかを評価します。
- 適合率(Precision): 予測された軌跡のうち、実際に関連性の高いアクションがどれだけ含まれているかを測定します。
- 再現率(Recall): 期待される軌跡のうち、どれだけのアクションが予測された軌跡に含まれているかを測定します。
- 単一ツールの使用(Single-tool use): 特定のツールが使用されたかどうかを確認します。
- 最終的な応答の評価指標:
response_match_score: ADKで提供される指標で、ROUGEメトリックを用いてエージェントの最終応答と期待される応答の類似度を計算します。- Vertex AIの評価サービスでは、モデルのレスポンス評価と同様のプロセスで最終回答を評価できます。
- その他のパフォーマンス指標:
Vertex AIの評価では、応答時間(latency)や処理の成否(failure)といった指標も自動的に結果に含まれます。
C. ADK製のAgentをテストする
CIへの統合
事前にadk webのevalから評価を作成します。
テストを実施します。
adk evalでCLI経由で評価を実行します(docs)。
adk eval ./parent_folder/multi_tool_agent ./parent_folder/multi_tool_agent/evalsetf7974c.evalset.json
python-dotenv could not parse statement starting at line 1
/usr/local/lib/python3.11/site-packages/google/adk/evaluation/metric_evaluator_registry.py:88: UserWarning: [EXPERIMENTAL] MetricEvaluatorRegistry: This feature is experimental and may change or be removed in future versions without notice. It may introduce breaking changes at any time.
  metric_evaluator_registry = MetricEvaluatorRegistry()
Using evaluation criteria: {'tool_trajectory_avg_score': 1.0, 'response_match_score': 0.8}
/usr/local/lib/python3.11/site-packages/google/adk/cli/cli_tools_click.py:482: UserWarning: [EXPERIMENTAL] LocalEvalService: This feature is experimental and may change or be removed in future versions without notice. It may introduce breaking changes at any time.
  eval_service = LocalEvalService(
Unclosed client session
client_session: <aiohttp.client.ClientSession object at 0xffff718bfb90>
Unclosed connector
connections: ['deque([(<aiohttp.client_proto.ResponseHandler object at 0xffff71769550>, 38091.628560157)])']
co
Eval Run Summary
./parent_folder/multi_tool_agent/evalsetf7974c.evalset.json:
  Tests passed: 0
  Tests failed: 1
api_serveを利用して、以下のEndpointからテストを実施します。
http://localhost:8000/apps/{app_name}/eval_sets/{eval_set_id}/run_eval以下を満たさない場合はFailになります。
- 軌跡スコア
- レスポンス一致スコア
D. LangChain、LangGraphについて
LangChain、LangGraphについては、公式より具体的な評価方法が提供されています。
8. AgentEngineにおけるAgentのツール
A. 概要
本節では、AgentEngine上でエージェントが利用できるツール群の基本的な動作可否と、実運用時に影響するリソース制約について整理します。同期/非同期のAPI呼び出しが機能し、PillowやOpenCV、NumPyといった主要ライブラリを用いた画像処理・数値計算が問題なく実行できることを確認しました。一方で、CUDA/TensorFlow/PyTorchなどGPU必須のライブラリは利用不可でした。メモリ超過時にはエージェントから応答が返らない挙動が見られるため、resource_limitsによるCPU/メモリ設定の管理が重要になります。デフォルトはcpu:4、memory:4Giで、設定可能なCPUとメモリの範囲は3章で述べた仕様に従います。これらの前提のもと、Tool内での画像編集や簡易ベンチマークも安定して実行できることを確認しています。
B. 検証内容まとめ
| No | カテゴリ | 検証項目 | 内容/観点 | 検証結果 |
|---|---|---|---|---|
| 1 | API呼び出し | 同期通信 | requests等を使ってAPIを呼べるか | OK |
| 2 | API呼び出し | 非同期通信 | asyncioやaiohttpでAPIを呼べるか | OK |
| 3 | ライブラリ | Pillow | 画像読み込み/変換が可能か | OK |
| 4 | ライブラリ | OpenCV | 画像編集が可能か(CPU負荷が大きい処理含む) | OK: – pillow/1024×1024のGaussianBlur:0.09s – opencv/2048×2048のカラーtoグレースケール変換:0.03s |
| 5 | ライブラリ | NumPy | 行列計算や配列操作が正常に動作するか | OK: – 3000×3000行列積:1.22s, 7000×7000までは確認済 – 10000×10000の行列積演算で応答なし |
| 6 | ライブラリ | GPU系ライブラリ | CUDAやTensorFlowなどGPU必須のライブラリが使えるか | NG |
| 7 | リソース制約 | メモリ(RAM) | 大規模データ処理時に落ちないか | 指定したリソース(デフォルト4GB)を超える演算を行うと、Agentからレスポンスが返ってきません。 |
| 8 | ツール動作 | 画像編集処理 | Tool内で画像を編集できるか(Pillow/OpenCV連携) | OK |
検証内容詳細
API呼び出し/同期通信
def main_tool():

    import requests

    response = requests.get("<https://example.com>")
    agent_engine_print("ステータスコード:", response.status_code)
    agent_engine_print("レスポンス本文:", response.text)

    agent_engine_print("tool success")

# LLM Agentを作成する
root_agent = LlmAgent(
    model="gemini-2.0-flash",
    name="stateful_agent",
    instruction="""Please transfer all query to main_tool, and reply to "tool done".
""",
    tools=[main_tool],
)
API呼び出し/非同期通信
async def fetch_example():
    async with httpx.AsyncClient() as client:
        response = await client.get("<https://example.com>")
        agent_engine_print("ステータスコード:", response.status_code)
        agent_engine_print("レスポンス本文:", response.text)

async def main_task():
    await fetch_example()

def main_tool():
    asyncio.run(main_task())

    agent_engine_print("tool success")

# LLM Agentを作成する
root_agent = LlmAgent(
    model="gemini-2.0-flash",
    name="stateful_agent",
    instruction="""Please transfer all query to main_tool, and reply to "tool done".
""",
    tools=[main_tool],
)
ライブラリ/Pillow
def pillow_sample():
    from PIL import Image, ImageDraw, ImageFont
    import io
    import os

    # 1. 新規作成(白背景)
    img = Image.new("RGB", (200, 200), color="white")

    # 2. 描画(青い四角と文字)
    draw = ImageDraw.Draw(img)
    draw.rectangle((50, 50, 150, 150), fill="blue", outline="black")
    draw.text((60, 160), "Pillow!", fill="black")

    # 3. 保存
    save_path = "sample.png"
    img.save(save_path, format="PNG")

    # 4. 読み込み直し
    loaded = Image.open(save_path)

    # 5. 変換(グレースケール)
    gray = loaded.convert("L")

    # 6. サイズ変更
    resized = gray.resize((100, 100))

    # 7. 別名で保存
    out_path = "sample_gray_resized.png"
    resized.save(out_path, format="PNG")

    agent_engine_print(f"tool success, saved: {out_path}")

def main_tool():
    pillow_sample()

    agent_engine_print("tool success")

# LLM Agentを作成する
root_agent = LlmAgent(
    model="gemini-2.0-flash",
    name="stateful_agent",
    instruction="""Please transfer all query to main_tool, and reply to "tool done".
""",
    tools=[main_tool],
)
ライブラリ/OpenCV
def exec_code():
    import cv2
    import numpy as np

    # ダミー画像を生成 (白黒のランダムノイズ画像)
    img = np.random.randint(0, 256, (1024, 1024), dtype=np.uint8)

    # 重め処理: ガウシアンぼかし (カーネル大きめ)
    blurred = cv2.GaussianBlur(img, (25, 25), 0)

    # エッジ検出
    edges = cv2.Canny(blurred, 100, 200)

    # リサイズ (半分に縮小)
    resized = cv2.resize(edges, (512, 512))

    # AgentEngineの出力
    agent_engine_print(f"tool success: processed image shape {resized.shape}")

def main_tool():
    exec_code()

    agent_engine_print("tool success")

# LLM Agentを作成する
root_agent = LlmAgent(
    model="gemini-2.0-flash",
    name="stateful_agent",
    instruction="""Please transfer all query to main_tool, and reply to "tool done".
""",
    tools=[main_tool],
)
ライブラリ/NumPy
def exec_code():
    import numpy as np

    # memo
    # float64型1要素が8バイト
    # 5GB ≒ 5,000,000,000バイト ÷ 8バイト ≒ 625,000,000要素
    # 25000 x 25000=6.25e8のfloat64行列で、約5GBメモリ使用?Agentからのレスポンスがなくなる

    size = 5000
    A = np.random.rand(size, size)
    B = np.random.rand(size, size)

    # 行列積を計算
    C = np.dot(A, B)

    # 結果の一部を確認
    print("行列サイズ:", C.shape)
    print("C[0,0]:", C[0, 0])

def main_tool():
    exec_code()

    agent_engine_print("tool success")

# LLM Agentを作成する
root_agent = LlmAgent(
    model="gemini-2.0-flash",
    name="stateful_agent",
    instruction="""Please transfer all query to main_tool, and reply to "tool done".
""",
    tools=[main_tool],
)
ライブラリ/GPU系ライブラリ
NG:(Could not find cuda drivers on your machine, GPU will not be used.)
def exec_code():
    import tensorflow as tf

    gpus = tf.config.list_physical_devices("GPU")

    agent_engine_print(f"GPU detected: {gpus}")

def main_tool():
    exec_code()

    agent_engine_print("tool success")

# LLM Agentを作成する
root_agent = LlmAgent(
    model="gemini-2.0-flash",
    name="stateful_agent",
    instruction="""Please transfer all query to main_tool, and reply to "tool done".
""",
    tools=[main_tool],
)
def exec_code():

    import torch

    # CUDAが使えるか確認
    cuda_available = torch.cuda.is_available()
    agent_engine_print(f"torch imported. CUDA available? {cuda_available}")

def main_tool():
    exec_code()

    agent_engine_print("tool success")

# LLM Agentを作成する
root_agent = LlmAgent(
    model="gemini-2.0-flash",
    name="stateful_agent",
    instruction="""Please transfer all query to main_tool, and reply to "tool done".
""",
    tools=[main_tool],
)
簡易ベンチマーク
def before_model_callback(callback_context, llm_request):
    agent_engine_print("agent called")

def exec_code():

    import time
    import numpy as np
    import cv2
    from PIL import Image, ImageFilter

    # numpy: 行列演算(CPUベンチマーク)
    start = time.time()
    a = np.random.rand(3000, 3000)
    b = np.dot(a, a)
    elapsed_numpy = time.time() - start

    # pillow: 画像フィルタ処理
    img = Image.new("RGB", (1024, 1024), color="red")
    start = time.time()
    img = img.filter(ImageFilter.GaussianBlur(15))
    elapsed_pillow = time.time() - start

    # opencv: 画像変換処理
    mat = np.random.randint(0, 256, (2048, 2048, 3), dtype=np.uint8)
    start = time.time()
    gray = cv2.cvtColor(mat, cv2.COLOR_BGR2GRAY)
    elapsed_opencv = time.time() - start

    agent_engine_print(
        {
            "numpy_time_sec": elapsed_numpy,
            "pillow_time_sec": elapsed_pillow,
            "opencv_time_sec": elapsed_opencv,
            "note": "CPU負荷処理の簡易ベンチマーク結果",
        }
    )

def main_tool():
    agent_engine_print("tool called")
    exec_code()
    agent_engine_print("tool success")

# LLM Agentを作成する
root_agent = LlmAgent(
    model="gemini-2.0-flash",
    name="stateful_agent",
    instruction="""Please transfer all query to main_tool, and reply to "tool done".
""",
    tools=[main_tool],
    before_model_callback=before_model_callback,
)
9. Agentの管理方法
A. DisplayName命名ガイドラインと開発フローの草案
- 基本フォーマット
<team>-<agent_name>-<environment>- 各変数:
- team: 所有チームの略称(英小文字、短縮形推奨)です。
- agent: Agentの識別名です。
- environment: 環境名(stg/dev/prd)です。
- 考慮事項:
- Agent EngineのDisplayNameに明示的な文字数制限はありません。ただし、他コンポーネントとの連携時に制限がある可能性があります。事前にプロジェクト内で合意し、制限をかけることを推奨します。
- 各変数:
- 各要素のルール
- team
- チーム名は一意の名称を使います。
- 例:
data,infra
- 例:
- 長いチーム名や日本語は避け、英小文字とハイフンのみ使用可能とします。
- 他チームと衝突しないよう、略称は事前に調整して登録します。
- チーム名は一意の名称を使います。
- agent_name
- agentの機能を簡潔に示す英小文字名とします。
- 例:
llmreview,notifier,api - 単語はハイフン区切りにします。
- 例:
user-sync,log-collector - チーム内で一意であれば問題ありません(チーム名が先頭に付くため全体では衝突しません)。
- environment
- 環境ごとに以下の接尾辞を使います。
- ステージング:
stg - 開発:
dev - 本番:
prd
- ステージング:
- 必要に応じて追加環境(
qa,sandboxなど)を定義してよいです。 - 3〜6文字程度の短縮形に統一します。
- 環境ごとに以下の接尾辞を使います。
- 表記はすべて英小文字+ハイフンのみとします。
- team
B. 開発の例
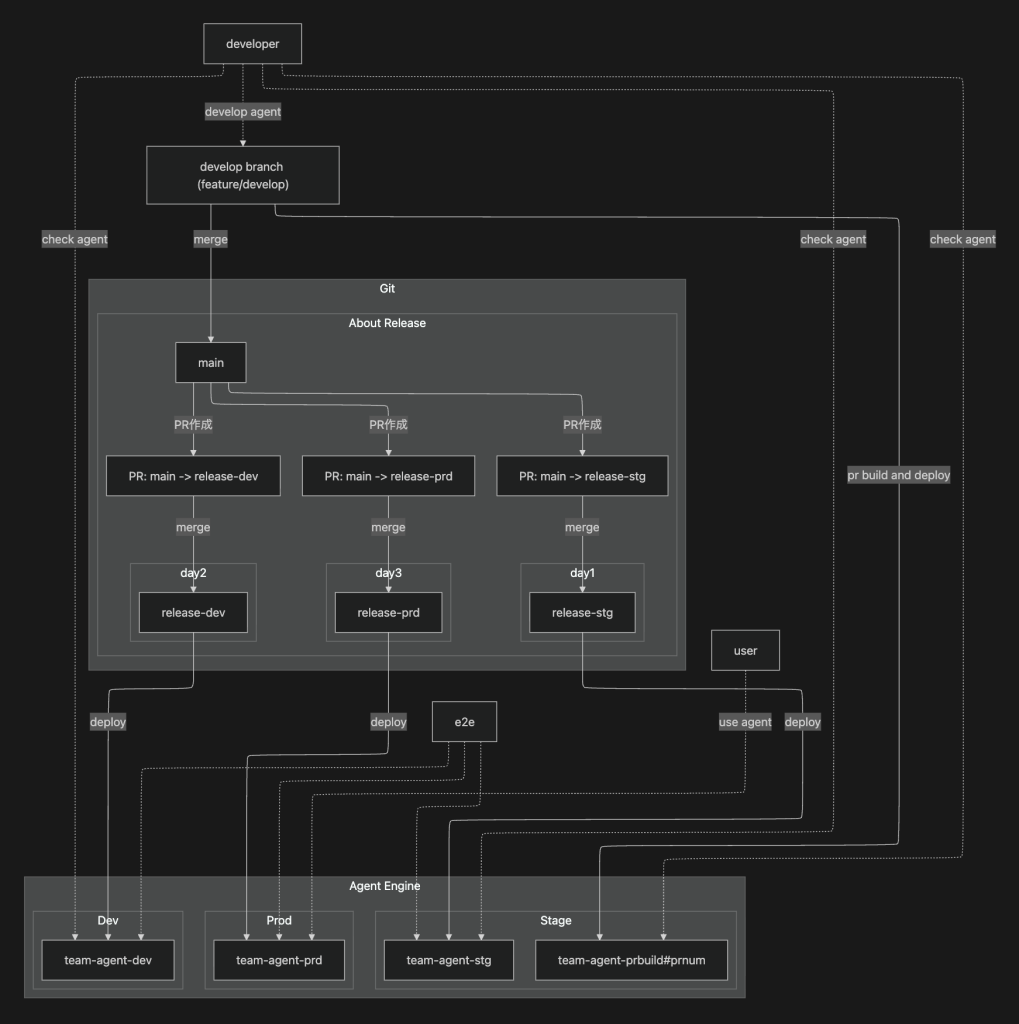
ここでは、Agent開発におけるGitリポジトリの戦略や、リリースフローの例を示します。
Gitリポジトリの戦略の例:
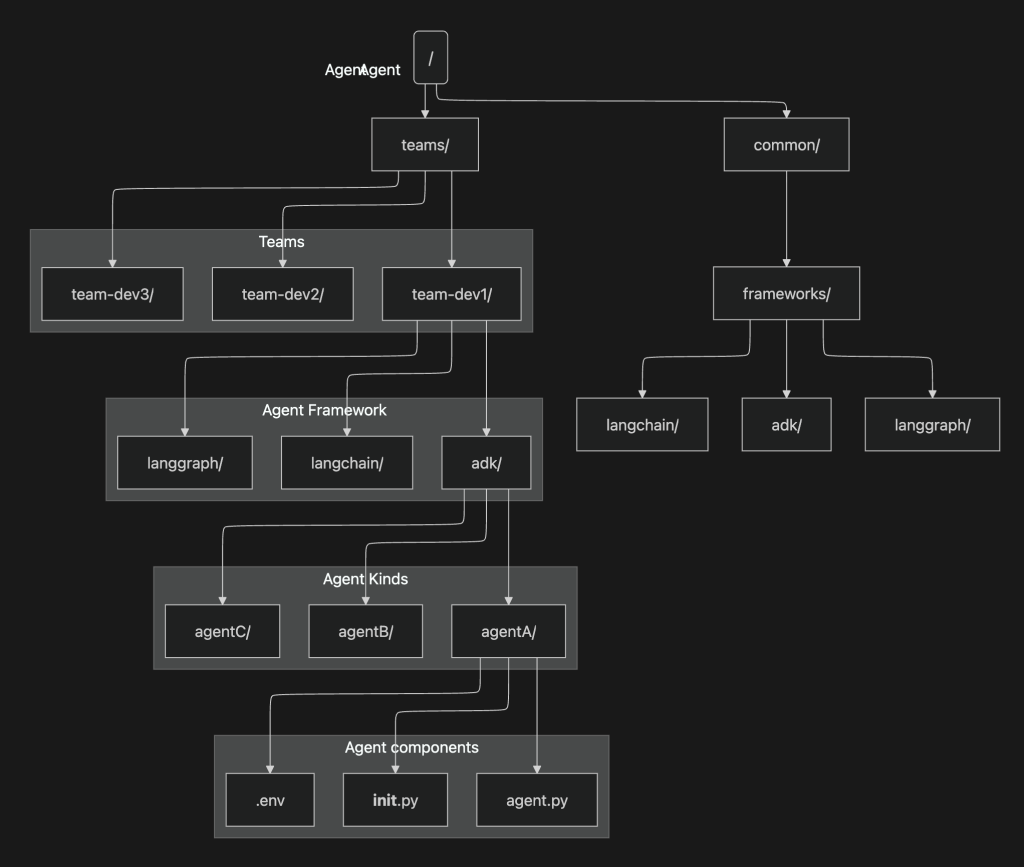
このMonorepoは チーム単位の責任分界 を軸に設計しつつ、フレームワークごとの共通化 も可能にする構造を採用しています。
teams/- 各開発チームのディレクトリをまとめるトップレベルです。
team-dev1/,team-dev2/,team-dev3/といった形でチームごとに責任範囲を明確に分割します。team-というprefixが必要なわけではありません。- チームディレクトリの配下にフレームワーク別のフォルダ(
adk/,langchain/,langgraph/)を設け、その中にエージェントごとのコードを配置します。 - 各エージェントは
agent.py,__init__.py,.envを持ち、独立した実行環境や設定を扱えます。
common/- 全チームで再利用する基盤コードやユーティリティをまとめる場所。
- 特にフレームワークごとに共有できる共通実装は
common/frameworks/以下に配置し、全チームから利用できるようにする。 - 例:
common/frameworks/langchain/に共通のChain実装やユーティリティ関数を置き、各チームのLangChainエージェントからインポート可能にする。
また、Agent Engineを主体とするリリースや開発の全体像を以下に示します。
C. Agent EngineにおけるAgentのアップデート方法(docs)
AgentEngineではデプロイ済みのAgentを更新する方法が備わっています。
updateTarget = (
    "projects/xxxxxxxxxx/locations/us-central1/reasoningEngines/1365457102255947776"
)

print(f"Creating remote app with name: {name}")
remote_app = agent_engines.update(
    resource_name=updateTarget,
    agent_engine=adk_app,
    requirements=[
        "google-cloud-aiplatform[adk,agent_engines]",
        "cloudpickle==3",
        "google-cloud-logging",
        "numpy",
        "pillow",
        "opencv-python-headless",
    ],
    display_name="hideichi-testagent-stg",
    description=description,
)
updateTargetはAgent EngineのUIから取得できます。
10. おわりに
本記事では、以下の点について整理しました。
- Agent Engine 提供時の設計要点(全体構成、認証・認可、Audit Logging の設計)
- セッション/会話監査とログの取りどころ(前段集約 vs Agent 内ミドルウェア)
- リソース制限など 2025/09/23 時点の性能仕様
- Memory Bank の仕組み・注意点(生成/取得/セキュリティ)
- Observability(Cloud Trace と AgentOps の使い分け)
- 利用可能なフレームワーク(ADK・LangChain・LangGraph)の運用TIPS
- エージェント評価(軌跡/最終応答)と CI 連携のヒント
- ツール実行可否・CPU系処理の実測、GPU不可の前提
- 命名規約、リリース/更新フロー
「まず安全に動かす」→「観測できるようにする」→「評価して改善する」の順が王道です。ここで挙げた内容はすべてを網羅しなくても良いとは考えています。必要に応じてつまみ食いしながら、自分たちの環境に合わせてオプトインしていくことが重要です。引き続き生成AIのトピックについて研究していきます。