Agent Development KitとAgent Engineを使ってVertex AI Agent Builderに入門してみる

1. 概要
本記事では、Googleが提供するAgent Development Kit (ADK) とAgent Engineを利用して、AIエージェントの構築方法を紹介しつつ、Vertex AI Agent Builderに入門します。まずADKを利用したエージェント構築の基本から、Python関数の統合やGoogle検索との連携、マルチエージェント構成など、段階的に実用的なエージェントへと拡張する方法を具体例を交えて解説していきます。また最後に、Agent Engineを活用したエージェントのデプロイと運用方法についても触れ、そのメリットと特定の制限についても言及します。
2. Vertex AI Agent Builder とは?
Vertex AI Agent Builder は、AIエージェントの構築とデプロイのための機能の集合です。
これは、AIエージェントの開発ライフサイクル全体をサポートするように設計された、いくつかの主要なコンポーネントで構成されています。主要なコンポーネントとして、Agent Garden, Agent Development Kit, Agent Engineがあります。
3. Vertex AI Agent Builderの主要コンポーネントの概要
Agent Garden
Agent Gardenは、AIエージェント開発のためのサンプルやツールを集めた厳選されたエージェント サンプルとツールのセットです。以下はその一部です。
- データサイエンス: 自然言語を使用して複数のソースにわたる多様なデータを照会し、予測モデルを構築し、傾向を視覚化し、重要な洞察を明確に伝えます。
- 旅行コンシェルジュ: パーソナライズされた旅行体験を編成し、初期計画からリアルタイムの旅程アラートまで、ユーザーの旅行全体にわたってサポートを提供します。
- Retrieval Augmented Generation: RAG を使用して指定された知識ソースから情報を取得し、応答が事実に基づいており、コンテキストを認識し、最新のものであることを保証します。
- ブランド検索最適化: ブランドに関連する上位のキーワードと競合他社の検索結果を分析し、タイトルや説明などのコンテンツ要素を比較して、ブランドの検索エンジンランキングを向上させるための提案を生成します。
Agent Development Kit (ADK)
ADKは、GeminiとGoogle Cloudに統合されたオープンソースのAIエージェントフレームワークです。Pythonから利用する事ができて、AIエージェントの開発からデプロイまで、コードで完結します。
ADKを使用することで、GeminiモデルやOpenAIのモデル、Google AIツールを活用したAIエージェントを効率的に開発、デプロイ、評価し、より複雑なマルチエージェントシステムを構築することが可能になります。
Agent Engine
Vertex AI Agent Engineは、本番環境でAIエージェントを効率的かつ安定して運用するために必要な基盤技術を提供するフルマネージドサービスです。AI エージェントの管理、構築、デプロイのための機能が一式揃っていて、開発者はAgent開発に専念する事ができます。
本記事ではADK利用したAgent開発と拡張をユースケース別に行います。また、Agent EngineへAgentをデプロイしてみます。
4. 入門: Agent Development Kit (ADK)を使って、最短でAgentを構築する
この章では、ADKを利用して最短でAgentを作成します。また、公式ドキュメントのUsing Open & Local Models via LiteLLMによれば、Google Cloudが提供するLLMモデルだけでなく、他社のLLMモデルやローカルで動作するLLMモデルを利用できます。したがってここでは、Google Cloudが提供するGeminiモデルと、OpenAI社が提供するGPTモデルを利用する方法を示します。
作成したAgentは後続の章でユースケースに応じて拡張していきます。是非手を動かして一緒に動かしてみましょう。
Geminiを使ったAgent (他の章で拡張して利用します)
まずは以下をpipでインストールします。
# pip install -r requirements.txt
google-adk==0.5.0
google-cloud-aiplatform[agent_engines]==1.93.1
必要なライブラリをimportします。
import os

from google.adk.agents import (
    LlmAgent,
)
from google.adk.runners import Runner
from google.adk.sessions import InMemorySessionService
from google.genai import types
VertexAIを使う場合は、以下の記述が必要です。
# GCPプロジェクトIDとロケーションを設定
project_id = # TODO: YOUR GCP PROJECT NAME
location = "global"

app_name = "gemini_flash_agent_app"
username = "user_1"
session_id = "session_1"

# Vertex AIを使用するための環境変数を設定
os.environ["GOOGLE_CLOUD_PROJECT"] = project_id
os.environ["GOOGLE_CLOUD_LOCATION"] = location
os.environ["GOOGLE_GENAI_USE_VERTEXAI"] = "True"
LLM Agentを定義します。
# LLM Agentを作成する
root_agent = LlmAgent(
    name="gemini_flash_agent",
    description="This is a sample agent",
    model="gemini-2.0-flash",
    instruction="",
)
LLM Agentを利用するためのRunnerを作成します。
# Runnerを作成する
runner = Runner(
    agent=root_agent,
    app_name=app_name,
    session_service=InMemorySessionService(),
)
セッションを作成します。
ADKでは、Agentインスタンスとの会話を 、長期にわたる知識を活用する個別の会話スレッドとして考え、管理するための構造化された方法を提供しています。
# セッションを作成する
runner.session_service.create_session(
    app_name=app_name, user_id=username, session_id=session_id
)
作成したRunnerを実行するためのコードを作成します。
ADKではRunnerの実行にrunメソッドとrun_asyncが用意されていますが、ADKは非同期イベントループを基盤としており、run_asyncを使うことでエージェントの状態管理や外部サービス連携を効率的かつ安全に行えるためです(参考)
async def __run_agent(query: str):
    # Agentへのメッセージを作成する
    user_content = types.Content(
        role="user",
        parts=[
            types.Part(
                text=query,
            )
        ],
    )

    # Agentにメッセージを送信する
    executed_event = []
    async for event in runner.run_async(
        user_id=username,
        session_id=session_id,
        new_message=user_content,
    ):
        if event:
            executed_event.append(event.model_dump())

    final_response: str = (
        executed_event[-1].get("content", {}).get("parts", [])[0].get("text", {})
    )

    return final_response


def run_agent(query: str):
    print("You:   ", query)
    print("Agent: ", asyncio.run(__run_agent(query)))
全体像として以下のようになるはずです。
import asyncio
import os

from google.adk.agents import (
    LlmAgent,
)
from google.adk.runners import Runner
from google.adk.sessions import InMemorySessionService
from google.genai import types

# GCPプロジェクトIDとロケーションを設定
project_id = # TODO: YOUR GCP PROJECT NAME
location = "global"

# LLM Agentの名前とセッションIDを設定
app_name = "gemini_flash_agent_app"
username = "user_1"
session_id = "session_1"

# Vertex AIを使用するための環境変数を設定
os.environ["GOOGLE_CLOUD_PROJECT"] = project_id
os.environ["GOOGLE_CLOUD_LOCATION"] = location
os.environ["GOOGLE_GENAI_USE_VERTEXAI"] = "True"


# LLM Agentを作成する
root_agent = LlmAgent(
    name="gemini_flash_agent",
    description="This is a sample agent",
    model="gemini-2.0-flash",
    instruction="Answer user questions.",
)

# Runnerを作成する
runner = Runner(
    agent=root_agent,
    app_name=app_name,
    session_service=InMemorySessionService(),
)

# セッションを作成する
runner.session_service.create_session(
    app_name=app_name, user_id=username, session_id=session_id
)


async def __run_agent(query: str):
    # Agentへのメッセージを作成する
    user_content = types.Content(
        role="user",
        parts=[
            types.Part(
                text=query,
            )
        ],
    )

    # Agentにメッセージを送信する
    executed_event = []
    async for event in runner.run_async(
        user_id=username,
        session_id=session_id,
        new_message=user_content,
    ):
        if event:
            executed_event.append(event.model_dump())

    final_response: str = (
        executed_event[-1].get("content", {}).get("parts", [])[0].get("text", {})
    )

    return final_response


def run_agent(query: str):
    print("You:   ", query)
    print("Agent: ", asyncio.run(__run_agent(query)))


if __name__ == "__main__":
    run_agent("Hi")
早速Agentを実行してみましょう!
> python basic_agent.py
You:    Hi
Agent:  Hello! How can I help you today?
run_agentを繰り返す事で、構築したAgentは正しく、会話履歴を保有している事が確認できます。
if __name__ == "__main__":
    run_agent("こんにちは、私はヒデイチです。あなたは誰ですか?")
    run_agent("ところで私は誰でしたっけ?")
> python basic_agent.py
You: こんにちは、私はヒデイチです。あなたは誰ですか?
Agent: こんにちは、ヒデイチさん。私はサンプルエージェントです。よろしくおねがいします。
You: ところで私は誰でしたっけ?
Agent: あなたはヒデイチさんでしたね。OpenAI ChatGPTを利用するAgent
LiteLlmをinstallします。
pip install litellm環境変数にkeyをsetして、LiteLlmをモデルに設定するだけで、シームレスにOpenAIのLLMモデルを利用する事ができます。
# OpenAIのAPIキーを環境変数に設定
os.environ["OPENAI_API_KEY"] = "your openai api key here"

# LLM Agentを作成する
root_agent = LlmAgent(
    model=LiteLlm(model="openai/gpt-4o"),  # OpenAIのGPT-4oモデルを使用
    name="openai_agent",
    instruction="You are a helpful assistant powered by GPT-4o.",
)
全体像として以下のようになります。
import asyncio
import os

from google.adk.agents import (
    LlmAgent,
)
from google.adk.models.lite_llm import LiteLlm
from google.adk.runners import Runner
from google.adk.sessions import InMemorySessionService
from google.genai import types

# LLM Agentの名前とセッションIDを設定
app_name = "openai_agent_app"
username = "user_1"
session_id = "session_1"

# OpenAIのAPIキーを環境変数に設定
os.environ["OPENAI_API_KEY"] = "your openai api key here"

# LLM Agentを作成する
root_agent = LlmAgent(
    model=LiteLlm(model="openai/gpt-4o"),  # OpenAIのGPT-4oモデルを使用
    name="openai_agent",
    instruction="You are a helpful assistant powered by GPT-4o.",
)

# Runnerを作成する
runner = Runner(
    agent=root_agent,
    app_name=app_name,
    session_service=InMemorySessionService(),
)

# セッションを作成する
runner.session_service.create_session(
    app_name=app_name, user_id=username, session_id=session_id
)


async def __run_agent(query: str):
    # Agentへのメッセージを作成する
    user_content = types.Content(
        role="user",
        parts=[
            types.Part(
                text=query,
            )
        ],
    )

    # Agentにメッセージを送信する
    executed_event = []
    async for event in runner.run_async(
        user_id=username,
        session_id=session_id,
        new_message=user_content,
    ):
        if event:
            executed_event.append(event.model_dump())

    final_response: str = (
        executed_event[-1].get("content", {}).get("parts", [])[0].get("text", {})
    )

    print(executed_event)

    return final_response


def run_agent(query: str):
    print("You:   ", query)
    print("Agent: ", asyncio.run(__run_agent(query)))


if __name__ == "__main__":
    run_agent("Hi")
> python agent_with_openai.py
You:    Hi
Agent:  Hello! How can I assist you today?
5. 構築したAgentを拡張する
この章では、前章で作成した基本的なAI Agentに、ツールを持たせて拡張する方法を、ユースケース別に説明します。Agentは、ツールを活用することで、単なるテキスト生成から一歩進み、「品質の高い出力」、「外部情報の取得」「操作」「他のAgentとの連携」など、より実用的で多様なタスクを自律的にこなせるようになります。
AgentにPython関数を実行させる

4章で作成したAgentに、Pythonの関数を「ツール」として持たせることで、AI Agentの実用性と拡張性は大きく向上します。Python関数をツールとして持たせたAI Agentは、単なるチャット応答だけでなく、実際の業務処理や自動化、情報検索、レポート作成、外部サービス連携など、幅広い業務シーンで活用できます。
ここではミニマムな例として、cpuの情報を取得するshow_cpu_info関数を作成して、Agentにtoolとして持たせます。
import subprocess


# いつも通りのPython関数
def show_cpu_info():
    """show_cpu_info"""
    result = subprocess.run("lscpu", shell=True, capture_output=True, text=True)
    return result.stdout


# LLM Agentを作成する
root_agent = LlmAgent(
    name="gemini_flash_agent",
    description="This is a sample agent",
    model="gemini-2.0-flash",
    instruction="Answer user questions.",
    tools=[show_cpu_info],  # Python関数をツールとして登録
)
if __name__ == "__main__":
run_agent("cpu情報教えて")> python basic_agent.py
You: cpu情報教えて
Warning: there are non-text parts in the response: ['function_call'], returning concatenated text result from text parts. Check the full candidates.content.parts accessor to get the full model response.
Agent: CPUの情報は以下の通りです。
アーキテクチャ: aarch64
CPUの動作モード: 64-bit
バイトオーダー: Little Endian
CPU数: 8
オンラインCPUリスト: 0-7
スレッド/コア: 1
コア/ソケット: 8
ソケット数: 1
ベンダーID: 0x61
モデル: 0
ステッピング: 0x0
BogoMIPS: 48.00
脆弱性: (省略)
フラグ: fp asimd evtstrm aes pmull sha1 sha2 crc32 atomics fphp asimdhp cpuid asimdrdm jscvt fcma lrcpc dcpop sha3 asimddp sha512 asimdfhm dit uscat ilrcpc flagm sb paca pacg dcpodp flagm2 frint bf16Google検索機能をAgentに組み込む方法

4章で作成したAgentにGoogle検索機能をツールとして追加することで、Agentはインターネット上の最新情報を取得できるようになり、回答精度が飛躍的に向上します。ここでは、その実装方法とメリット、実際の活用例について詳しく解説します。
4章で作成したAgentにgoogle検索できるtoolを持たせて、検索できるAgentに拡張してみます。Agentが検索機能を持つと、回答精度が大幅に向上します。
まず必要なtoolをimportします
from google.adk.tools import google_search次にLLMにtoolを持たせます。
# LLM Agentを作成する
root_agent = LlmAgent(
    name="gemini_flash_agent",
    description="This is a sample agent",
    model="gemini-2.0-flash",
    instruction="You can use tools `google_search` to search.",  # ツールの説明を追加
    tools=[google_search],  # toolsを追加
)
これでAgentの拡張は完了です。早速使ってみましょう。 比較用に4章で構築した検索機能を持たないAgentの出力も添付しています。
if __name__ == "__main__":
    run_agent("3-shake株式会社の住所")
# 検索機能を持つAgent
> python basic_agent.py
You: 3-shake株式会社の住所
Agent: 3-shake株式会社の住所は以下の通りです。
* **本社:** 〒160-0015 東京都新宿区大京町22-1 グランファースト新宿御苑3F・4F# 検索機能を持たないAgent (4章のAgent)
> python basic_agent.py
You: 3-shake株式会社の住所
Agent: 3-shake株式会社の住所は、東京都新宿区四谷本塩町4-15 JPR四谷ビル8階です。検索機能を持つAgentは正しい情報を示しています。
AgentにSub Agentを持たせる
Agent Development Kitにおける「Sub Agent」は、複数のエージェントを階層的に構成し、役割を分担させるための仕組みです。これにより、各エージェントが専門性を持って特定のタスクを担当し、全体として柔軟かつ高機能なマルチエージェントシステムを構築できます。
Sub Agentを作ります。
# PythonコードをレビューするAgent. 応対する場合は、レビュアーのマイケルと名乗る。
code_review_agent = LlmAgent(
    name="code_review_agent",
    description="Agent that evaluates Python code.",
    model="gemini-2.0-flash",
    instruction="""
You are a review agent named "Michael." When responding, please say hello, "I'm Michael, the reviewer!"

You are an Agent that evaluates Python code.

The evaluation criteria are as follows:
1. Are type hints used to clarify intent, and static analysis tools used to improve maintainability?
2. Are indentation and naming conventions consistent, and does the code style remain consistent?

Please rate the code according to each evaluation item and provide feedback to users.
""",
)

# LLM Agentを作成する
root_agent = LlmAgent(
    name="gemini_flash_agent",
    description="This is a sample agent",
    model="gemini-2.0-flash",
    instruction="Answer user questions.",
    sub_agents=[code_review_agent], # sub_agentsを追加
)
コードを実行します。
if __name__ == "__main__":

    sample_code = """
def get_urls(self, query):
    urls = []
    for url in search(query, num_results=3, ssl_verify=False):
        logging.debug(f"url: {url}")
        urls.append(url)
    return urls
"""

    run_agent("hi")
    run_agent("Please review below:\n" + sample_code) # code_review_agentが応対することを期待
    run_agent("Make NextAction a bit more concise")
以下は実際の出力です。gemini_flash_agentにかわり、code_review_agentがコードレビューをしている事が確認できます。
> python subagent.py
You:    hi
Agent:  Hi! How can I help you today?

---
You:    Please review below:

def get_urls(self, query):
    urls = []
    for url in search(query, num_results=3, ssl_verify=False):
        logging.debug(f"url: {url}")
        urls.append(url)
    return urls
Agent:  Hello, I'm Michael, the reviewer!

Here's my review of the code:

**1. Type Hints and Static Analysis:**

*   **Improvement Needed:** The code lacks type hints. Adding type hints for the `query` parameter and the return value would improve readability and enable static analysis tools to catch potential type-related errors.

**2. Indentation and Naming Conventions:**

*   **Good:** Indentation is consistent.
*   **Good:** Naming conventions are appropriate (e.g., `get_urls`, `urls`, `query`).
*   **Suggestion:** Consider renaming ssl_verify to `ssl_verification`.
*   **Suggestion:** Consider using a more descriptive variable name instead of `url` such as `result_url`.

**Revised Code with Suggestions:**

```python
from typing import List
import logging

def get_urls(self, query: str) -> List[str]:
    urls: List[str] = []
    for result_url in search(query, num_results=3, ssl_verification=False):
        logging.debug(f"url: {result_url}")
        urls.append(result_url)
    return urls
```

In summary, the code is generally well-structured, but adding type hints would significantly improve its maintainability and robustness.

---
You:    Can you summarise it a bit more?
Agent:  Hello, I'm Michael, the reviewer!

Okay, here's a shorter summary:

The code is good but could be improved by adding type hints to increase readability and allow for static analysis. The indentation and naming are consistent. Consider renaming `ssl_verify` to `ssl_verification`.

---
Agentをtool化するAgentTool

Agent Development Kitには、「AgentTool」という仕組みが用意されています。これは、既存のエージェントをツールとして他のエージェントから呼び出せるようにするためのラッパー機能です。ここでは、特定の分野に関する専門家Agentを構築して、AgentToolに落とし込み、実行してみます。
専門家Agentを作成します。このチャプターでは、Kubernetesに関する専門家Agentを作成します。
from googlesearch import search
from google.adk.tools.agent_tool import AgentTool
from bs4 import BeautifulSoup
import logging

# Kubernetesに関する情報を取得するためのTool
class KubernetesResearchTool:
    def __get_urls(self, query: str) -> list[str]:
        """Fetch URLs related to the Kubernetes research query.

        Args:
            query (str): The research query.

        Returns:
            list[str]: A list of URLs related to the query.
        """
        urls = []
        for url in search(query, num_results=3, ssl_verify=False):
            logging.debug(f"url: {url}")
            urls.append(url)
        return urls

    def __get_pages_from_url(self, urls: list[str]) -> list[str]:
        """Fetch the page content from a list of URLs.

        Args:
            urls (list[str]): A list of URLs to fetch.

        Returns:
            list[str]: A list of page content fetched from the URLs.
        """
        page_content = []
        for url in urls:

            logging.debug(f"Fetching URL: {url}")
            response = requests.get(url)
            response.raise_for_status()

            soup = BeautifulSoup(response.text, "html.parser")

            page_content.append(soup.get_text())

        return page_content

    def run_research(self, query: str) -> list[str]:
        """Run the search and get page content."""
        urls = self.__get_urls(query + " site:kubernetes.io")
        page_content = self.__get_pages_from_url(urls)
        return page_content


kubernetes_research_tool = KubernetesResearchTool()

# Kubernetes専門家Agent
kubernetes_research_agent = AgentTool(
    LlmAgent(
        name="kubernetes_research_agent",
        description="This is an AI agent that investigates Kubernetes specifications. It investigates documentation and knowledge about Kubernetes. ",
        model="gemini-2.0-flash",
        instruction="Please conduct your research using the `kubernetes_research_tool.run_research` tool.",
        tools=[kubernetes_research_tool.run_research], # Kubernetesに関する情報取得のためのTool
    )
)

# LLM Agentを作成する
root_agent = LlmAgent(
    name="gemini_flash_agent",
    description="This is a sample agent",
    model="gemini-2.0-flash",
    instruction="You are a great assistant. Please reply to user messages. Use the tools provided if necessary.",
    tools=[kubernetes_research_agent], # toolsとして持たせる
)
Kubernetesに関する質問を飛ばします。
if __name__ == "__main__":
    run_agent("普通のkubernetesのノード数の限界ってどれくらい?")
以下は実際の出力です。自身でも調査しましたが正しい情報でした(参考1, 参考2)
You:    普通のkubernetesのノード数の限界ってどれくらい?
Agent:   Kubernetesのノード数の上限は、一般的には5,000ノードです。ただし、Google Kubernetes Engine(GKE)では、Spannerをバックエンドとして使用することで、最大65,000ノードのクラスターをサポートしています。
補足 Sub AgentとAgentToolの違い
Sub AgentとAgentToolの違いとして重要なのは、会話履歴を保持するか否かの違いと考えています。Sub Agentは主となるAgentと同様の会話履歴を持っています。一方AgentToolの場合は主となるAgentが入力を作成し、最終的な出力を得るので、過程(会話履歴)を保持しません。
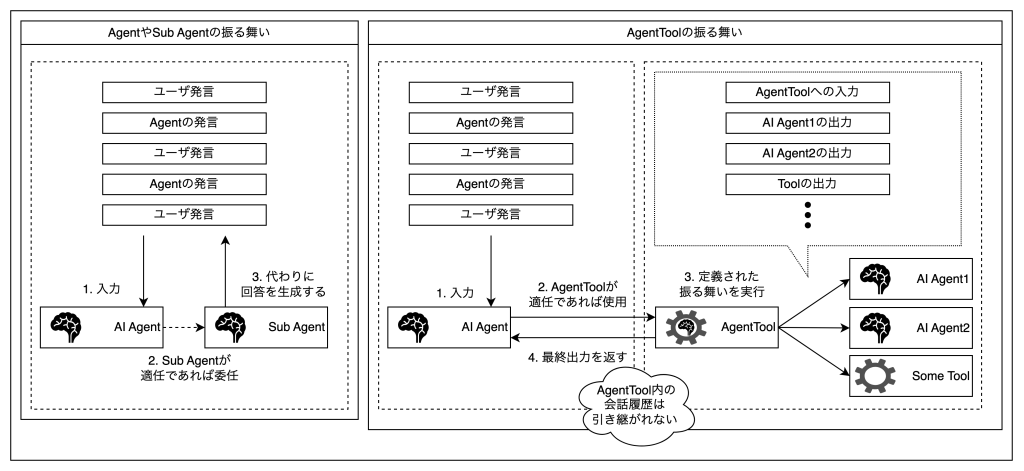
Agent Development Kit において、「Sub Agent」と「AgentTool」は類似していますが、設計思想や用途に明確な違いがあります。特に重要なのは「会話履歴の保持」に関する違いです。
Sub Agent
- サブエージェントは、メインとなるエージェント(ルートエージェント)と同様に「会話履歴を保持」する仕組みを持っています。
- たとえば、ユーザーとの会話の流れが途中でサブエージェントに切り替わった場合でも、それまでの会話履歴が引き継がれ、継続的かつ文脈を踏まえた応答が可能です。
AgentTool
- AgentToolは、既存のエージェントを「自然言語テキストを入力すると、自然言語テキストが出力される関数」としてラップし、ツールとして利用できる仕組みです。
- つまり、主エージェントがAgentToolに入力を渡し、得られた出力をユーザーに返すだけで、AgentToolは過去の会話履歴を参照しません。
6. Agentのオーケストレーション
Sequential agents
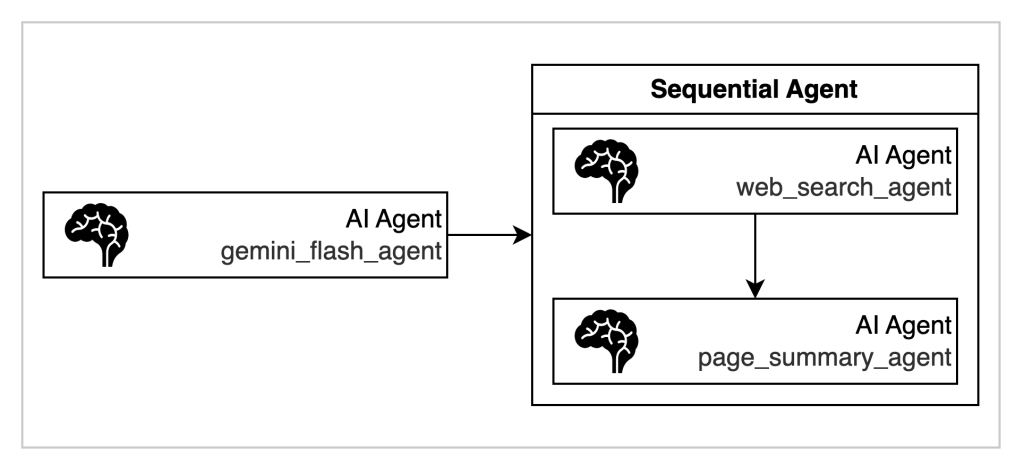
Sequential agentsとは、複数のAIエージェントを事前に定義した順序で次々と実行し、前のエージェントの出力を次のエージェントの入力として渡すことで、複雑なタスクを段階的に処理できるワークフローエージェントの一種です。ここでは、Web検索を行うAgentと、検索結果のページを要約するAgentを用意してシーケンシャルに実行できるように定義します。
4章のコードに以下を追加します。
import logging
import requests
from bs4 import BeautifulSoup
from google.adk.agents import LlmAgent, SequentialAgent
from googlesearch import search

# WebSearchを実現するツール
class WebSearchTool:
    def __get_urls(self, query: str) -> list[str]:
        """Fetch URLs related to the query.

        Args:
            query (str): The research query.

        Returns:
            list[str]: A list of URLs related to the query.
        """
        urls = []
        for url in search(query, num_results=1, ssl_verify=False):
            logging.debug(f"url: {url}")
            urls.append(url)
        return urls

    def __get_pages_from_url(self, urls: list[str]) -> list[str]:
        """Fetch the page content from a list of URLs.

        Args:
            urls (list[str]): A list of URLs to fetch.

        Returns:
            list[str]: A list of page content fetched from the URLs.
        """
        page_content = []
        for url in urls:

            logging.debug(f"Fetching URL: {url}")
            response = requests.get(url)
            response.raise_for_status()

            soup = BeautifulSoup(response.text, "html.parser")

            page_content.append(soup.get_text())

        return page_content

    def run_research(self, query: str) -> list[str]:
        """Run the search and get page content."""
        urls = self.__get_urls(query)
        page_content = self.__get_pages_from_url(urls)
        return page_content


web_search_tool = WebSearchTool()

# WebSearchを行うAgent
web_search_agent = LlmAgent(
    name="web_search_agent",
    description="This is an AI agent that investigates web content. It investigates documentation and knowledge about various topics.",
    model="gemini-2.0-flash",
    instruction="Please conduct your research using the `web_search_tool.run_research` tool.",
    tools=[web_search_tool.run_research],
)

# 検索結果を要約するAgent
page_summary_agent = LlmAgent(
    name="page_summary_agent",
    description="This is an AI agent that summarizes web content. It summarizes the content fetched by the web search agent.",
    model="gemini-2.0-flash",
    instruction="Please summarize the content.",
)

# Sequentialに実行できるようにSequentialAgentとして定義
web_search_and_summary_agent = SequentialAgent(
    name="web_search_and_summary_agent",
    description="This agent first searches the web for information and then summarizes the content.",
    sub_agents=[web_search_agent, page_summary_agent],
)

# LLM Agentを作成する
root_agent = LlmAgent(
    name="gemini_flash_agent",
    description="This is a sample agent",
    model="gemini-2.0-flash",
    instruction="You are a great assistant. Please reply to user messages. ",
    sub_agents=[web_search_and_summary_agent], # SequentialAgentを登録する
)
実行すると以下のようになります。
if __name__ == "__main__":
    run_agent("美味しい唐揚げの作り方を調べて")
You: 美味しい唐揚げの作り方を調べて
Agent: このレシピは、鶏もも肉をマヨネーズ、醤油、酒、生姜、ニンニクで下味をつけ、片栗粉と小麦粉を混ぜた衣で揚げます。美味しく仕上げるコツは、下味にマヨネーズを使いジューシーに、衣は片栗粉と小麦粉のダブル使いでカリカリに、そして揚げる際は中温で火を通し最後に高温でカリッとさせることです。LoopAgent
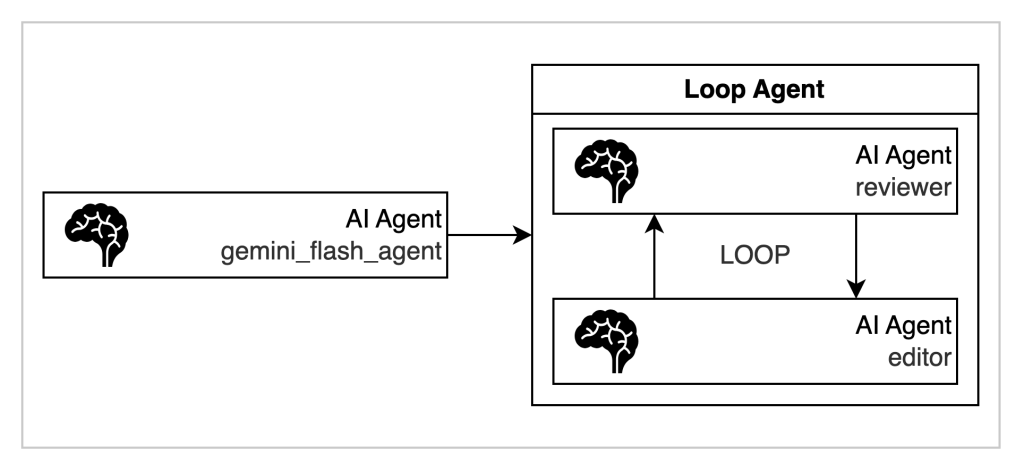
LoopAgentとは、指定したサブエージェント群をループ(反復)で実行するためのエージェントです。主に「繰り返し」や「反復的な改善」が必要なワークフローに利用されます。サブエージェントを順番に実行し、その一連の処理を「指定回数」または「終了条件が満たされるまで」繰り返します。
ここでは、カスタマーサポートを支援するAgentを考えてみます。機能としては、利用者に伝えたいことを雑多に羅列すると、一定のレビュー観点を満たすまで、修正とレビューを繰り返すReviewAgentです。
4章のコードに以下を加えます。
from google.adk.agents import LlmAgent, LoopAgent
from google.adk.tools.tool_context import ToolContext

# 文章をEditするAgent
editor_agent = LlmAgent(
    name="editor_agent",
    description="This is editor_agent agent",
    model="gemini-2.0-flash",
    instruction="""
You are a customer response support agent.
You are presented with the content you wish to reply to the customer.
You are asked to compose a reply, considering the wording and the structure of the text.
If there is any information that you are unsure of when editing, please temporarily replace it with XXX.
**You only need to reply to the customer and no other explanations are required.**
""",
    output_key="proposed_reply", # 出力結果をstateに入れる
)

# レビュー観点を満たしていた場合場合に、呼び出すツール。ループを終了するトリガーになります。
def exit_loop(tool_context: ToolContext):
    """If, after reviewing the results, you find no problems, use this tool."""
    print(f"  [Tool Call] exit_loop triggered by {tool_context.agent_name}")
    tool_context.actions.escalate = True
    # Return empty dict as tools should typically return JSON-serializable output
    return {}

# 生成された文章をレビューするレビュアーAgent
reviewr_agent = LlmAgent(
    name="reviewr_agent",
    description="This is a reviewr_agent agent",
    model="gemini-2.0-flash",
    tools=[exit_loop], # ループを終了するトリガーツールを持たせる
    instruction="""You are a customer response support agent.
You will be presented with a reply message to the customer. Please review the text for suitability as a customer response and only present the results of your review. Subsequent Agents will make corrections.

Review perspective:
- Are honorifics and polite language used appropriately?
- Are the expressions used to show appreciation and consideration for the customer?
- Are there no expressions that may cause discomfort or a superior attitude?
- Is it addressed to someone?
- Is it signed by the person responding?
""",
)

# ループAgentとして定義する
review_and_edit_agent = LoopAgent(
    name="review_and_edit_agent",
    description="""This is a loop agent that manages the editor and reviewer agents.
Please use this Agent to correct customer support related documents.
The completed reply will be stored under the state key "proposed_reply", so please output it to the user at the end.""",
    sub_agents=[editor_agent, reviewr_agent], # 定義された順に実行される
    max_iterations=3, # デモでは最大3回とする
)

# LLM Agentを作成する
root_agent = LlmAgent(
    name="gemini_flash_agent",
    description="This is a sample agent",
    model="gemini-2.0-flash",
    instruction="Answer user questions.",
    sub_agents=[review_and_edit_agent],
)
実行します。
if __name__ == "__main__":
    run_agent(
        """
以下の返信文をカスタマーサポートの返信として出したいので文章考えて
---
現状ではクラスタの上限数は1ユーザあたり5まで
1チームの予算決まってる
特別な事情がないと対応できない
稟議必要
"""
    )
[Tool Call] exit_loop triggered by reviewr_agent
Agent: お問い合わせありがとうございます。
クラスタの上限数につきましては、現状、1ユーザーあたり5つまでとなっております。
また、1チームあたりの予算も決まっており、特別なご事情がない限り、ご希望に沿えない場合もございます。
上限数の拡張をご希望の場合は、稟議が必要となりますので、恐れ入りますが、ご了承ください。
〇〇様
XXX株式会社
XXX補足: editor_agentで使用したoutput_keyとは?
output_keyは、ADKのStateと呼ばれる機能を利用して、セッションごとの動的な情報を保持するための仕組みを指します。会話の進行中に必要となる一時的なデータやユーザー設定、タスクの進捗などを格納するメモ帳のような役割を果たします。Agentにプロンプト中で、「State key XXXから情報を取ってきて」と指示することで、情報取得ができます。
8. AgentEngineを使ってみる
Vertex AI Agent Engineとは?
Vertex AI Agent Engineは、Google Cloud上でAIエージェントをデプロイ・管理・スケールできるフルマネージドサービスです。インフラ管理を気にせず、Agent開発に集中できます。ここでは、Develop and deploy agents on Vertex AI Agent Engine を参考に、以下のチュートリアルを行います。
- 作成したAgentをAgentEngineにデプロイする
- AgentEngineにデプロイされたAgentをローカルで使う
- AgentEngineにデプロイされたAgentを削除する
作成したAgentをAgentEngineにデプロイする
4章で作成したagentをAgentEngineとしてローカルで検証&アップロードを行ってみます。
Vertex AI SDKをインストール
pip install google-cloud-aiplatform[adk,agent_engines]初期化を行います
import vertexai

PROJECT_ID = "your-project-id"
LOCATION = "us-central1"
STAGING_BUCKET = "gs://your-google-cloud-storage-bucket"

vertexai.init(
    project=PROJECT_ID,
    location=LOCATION,
    staging_bucket=STAGING_BUCKET,
)
AgentEngine用にAgentをラップします。ローカルでAgentを試すことができます。
from vertexai.preview import reasoning_engines

app = reasoning_engines.AdkApp(
    agent=root_agent, # 4章で作成したAgent
    enable_tracing=True,
)

# セッションを作成する
session = app.create_session(user_id=username)

def run_agent(query: str):
    for event in app.stream_query(
        user_id=username,
        session_id=session.id,
        message=query,
    ):
        print(event["content"]["parts"][0]["text"])

if __name__ == "__main__":
    run_agent("hi")
Hi there! How can I help you today?AgentEngineへDeployする
from vertexai import agent_engines

remote_app = agent_engines.create(
    agent_engine=root_agent,
    requirements=[
        "google-cloud-aiplatform[adk,agent_engines]"
    ]
)

print(remote_app.resource_name)
# アップロードされたAgentのリソース名。後に利用する際に必要になります。
projects/xxxxxxxx/locations/us-central1/reasoningEngines/1991831284413890560この章における全体像は以下のとおりです。
import os

import vertexai
from google.adk.agents import (
    LlmAgent,
)
from vertexai import agent_engines
from vertexai.preview import reasoning_engines

# GCPプロジェクトIDとロケーションを設定
project_id = # TODO: YOUR GCP PROJECT NAME
location = "us-central1"

# LLM Agentの名前とセッションIDを設定
app_name = "gemini_flash_agent_app"
username = "user_1"
session_id = "session_1"

# Vertex AIを使用するための環境変数を設定
os.environ["GOOGLE_CLOUD_PROJECT"] = project_id
os.environ["GOOGLE_CLOUD_LOCATION"] = location
os.environ["GOOGLE_GENAI_USE_VERTEXAI"] = "True"


vertexai.init(
    project=project_id,
    location=location,
    staging_bucket=f"gs://{project_id}",
)

# LLM Agentを作成する
root_agent = LlmAgent(
    name="gemini_flash_agent",
    description="This is a sample agent",
    model="gemini-2.0-flash",
    instruction="Answer user questions.",
)

app = reasoning_engines.AdkApp(
    agent=root_agent,  # 4章で作成したAgent
    enable_tracing=True,
)

session = app.create_session(user_id=username)
print(session)


def run_agent(query: str):
    for event in app.stream_query(
        user_id=username,
        session_id=session.id,
        message=query,
    ):
        print(event["content"]["parts"][0]["text"])


remote_app = agent_engines.create(
    agent_engine=root_agent, requirements=["google-cloud-aiplatform[adk,agent_engines]"]
)

print(remote_app.resource_name)
AgentEngineにデプロイされたAgentをローカルで使う
アップロードされたAgentの一覧を取得してみます。ここでは、以下のcurlとjqコマンドを利用して、一覧を取得します。
curl -X GET \
     -H "Authorization: Bearer $(gcloud auth print-access-token)" \
     "https://LOCATION-aiplatform.googleapis.com/v1/projects/PROJECT_ID/locations/LOCATION/reasoningEngines" | jq ".reasoningEngines[].name"

"projects/xxxxxxxx/locations/us-central1/reasoningEngines/1991831284413890560"
以下のコードをしてAgentEngineにアップロードされたAgentを使用できます。
import vertexai
from vertexai import agent_engines

# GCPプロジェクトIDとロケーションを設定
project_id = "your project id"
location = "us-central1"

username = "user_1"


vertexai.init(
    project=project_id,
    location=location,
    staging_bucket=f"gs://{project_id}",
)

RESOURCE_ID = (
    "projects/xxxxxxxx/locations/us-central1/reasoningEngines/1991831284413890560"
)

remote_app = agent_engines.get(RESOURCE_ID)

remote_session = remote_app.create_session(user_id=username)


def run_agent(query: str):
    for event in remote_app.stream_query(
        user_id=username,
        session_id=remote_session["id"],
        message=query,
    ):
        print(event["content"]["parts"][0]["text"])


if __name__ == "__main__":
    run_agent("Hi")
AgentEngineにデプロイされたAgentを削除する
以下のCurlを叩くことで削除する事ができます(参考)
curl -X DELETE \
     -H "Authorization: Bearer $(gcloud auth print-access-token)" \
     "https://LOCATION-aiplatform.googleapis.com/v1/projects/PROJECT_ID/locations/LOCATION/reasoningEngines/RESOURCE_ID?force=true"
以下のようなレスポンスが帰ってくれば削除されています。
{
  "name": "projects/xxxxxxxx/locations/us-central1/operations/4876313006666940416",
  "metadata": {
    "@type": "type.googleapis.com/google.cloud.aiplatform.v1.DeleteOperationMetadata",
    "genericMetadata": {
      "createTime": "2025-06-15T07:14:12.382298Z",
      "updateTime": "2025-06-15T07:14:12.382298Z"
    }
  },
  "done": true,
  "response": {
    "@type": "type.googleapis.com/google.protobuf.Empty"
  }
}
AgentEngineが向かないユースケース
AgentEngineは、エンジニアがAIエージェント本体の開発に特化できる、利便性の高いフルマネージドサービスです。ただし、一部のユースケースではAgentEngineが最適というわけではありません。例えば、会話履歴の実体がAgentEngine内に閉じないユースケースです。ここでは、次のようなSlackBotについて考えてみます。
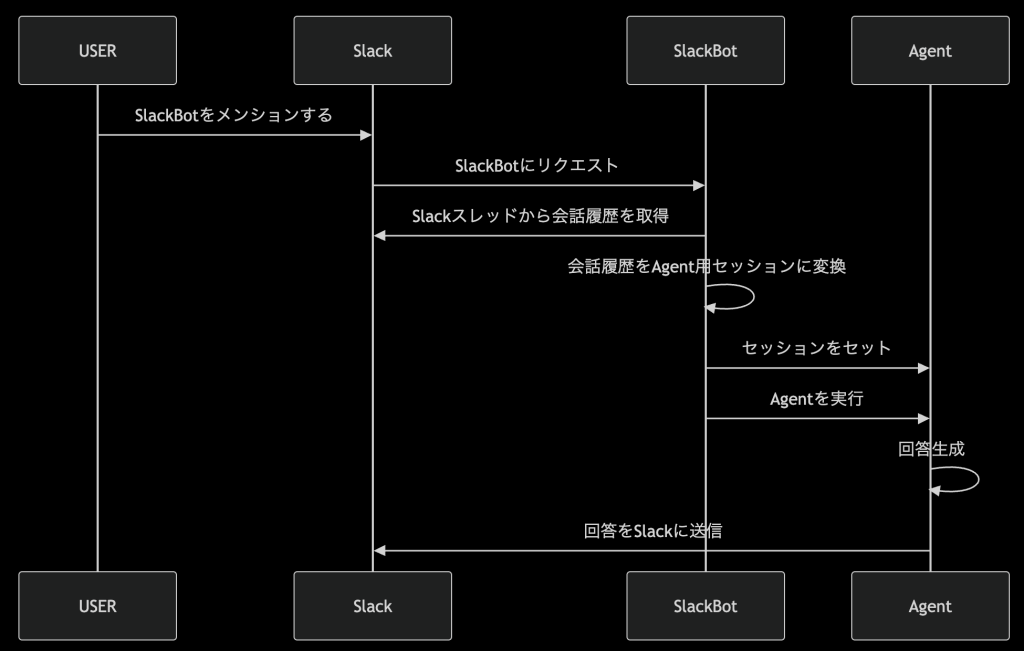
このユースケースでは、Slackスレッドのメッセージを会話履歴をコンテキストとしてAgentを実行し、回答を生成しています。ADKではセッションという機能を利用して、コンテキスト管理が行われていて、ローカルでは、以下のようにすれば会話履歴をインポートすることができます。
import asyncio
import os

from google.adk.agents import (
    LlmAgent,
)
from google.adk.events import Event
from google.adk.runners import Runner
from google.adk.sessions import InMemorySessionService
from google.genai import types

# GCPプロジェクトIDとロケーションを設定
project_id = # TODO: YOUR GCP PROJECT NAME
location = "global"

# LLM Agentの名前とセッションIDを設定
app_name = "gemini_flash_agent_app"
username = "user_1"
session_id = "session_1"

# Vertex AIを使用するための環境変数を設定
os.environ["GOOGLE_CLOUD_PROJECT"] = project_id
os.environ["GOOGLE_CLOUD_LOCATION"] = location
os.environ["GOOGLE_GENAI_USE_VERTEXAI"] = "True"

# LLM Agentを作成する
root_agent = LlmAgent(
    name="gemini_flash_agent",
    description="This is a sample agent",
    model="gemini-2.0-flash",
    instruction="Answer user questions.",
)

session_service = InMemorySessionService()

# Runnerを作成する
runner = Runner(
    agent=root_agent,
    app_name=app_name,
    session_service=session_service,
)

# セッションを作成する
session = runner.session_service.create_session(
    app_name=app_name, user_id=username, session_id=session_id
)

# 会話履歴の実体
event = Event(
    author="user",
    invocation_id="001",
    content=types.Content(
        role="user",
        parts=[types.Part(text="Hi. Im' Hideichi!")],
    ),
)

# セッションにイベントを追加する。
# 会話履歴が2個以上の場合はforでappend_eventを繰り返せば良い
session_service.append_event(session, event)

async def __run_agent(query: str):
    # Agentへのメッセージを作成する
    user_content = types.Content(
        role="user",
        parts=[
            types.Part(
                text=query,
            )
        ],
    )

    # Agentにメッセージを送信する
    executed_event = []
    async for event in runner.run_async(
        user_id=username,
        session_id=session_id,
        new_message=user_content,
    ):
        if event:
            executed_event.append(event.model_dump())

    final_response: str = (
        executed_event[-1].get("content", {}).get("parts", [])[0].get("text", {})
    )

    return final_response

def run_agent(query: str):
    print("You:   ", query)
    print("Agent: ", asyncio.run(__run_agent(query)))

if __name__ == "__main__":
    run_agent("私は誰ですか?")
過去の会話履歴が正しく読み込まれているか、質問を投げて確認する事ができます。
> python sessiontutorial.py
You:    私は誰ですか?
Agent: あなたは秀一さんです。ローカル上ではこのような操作が可能ですが、AgentEngineでは2025年6月16日時点で、Manage sessions using direct API calls にでeventを編集する方法が提供されていません。したがって、会話履歴をAppendする必要があるケースにおいては、eventやsessionを自前で管理する独自実装が必要になります。
2025/7/25追記
SessionServiceClientを使うことで、AgentEngine上のSessionを操作できることを確認しました。以下の例では、会話情報を任意のセッションに追加する例です。
# pip install "google-adk==1.8.0"

from datetime import datetime
from typing import Literal

import vertexai
from google.cloud import aiplatform_v1beta1


class SessionTutorial:
    def __init__(self, project_id, location, agent_engine_name, session_name):
        self.client = vertexai.Client(
            project=project_id,
            location=location,
        )

        self.project_id = project_id
        self.location = location
        self.agent_engine_name = agent_engine_name
        self.session_name = session_name

        self.sessions_client = aiplatform_v1beta1.SessionServiceClient(
            client_options={
                "api_endpoint": f"https://{location}-aiplatform.googleapis.com"
            },
            transport="rest",
        )

    def show_list_events(self):
        """List all events in the session"""
        request = aiplatform_v1beta1.ListEventsRequest(
            parent=self.session_name,
        )

        page_result = self.sessions_client.list_events(request=request)

        for response in page_result:
            print(response)

    def append_new_conversation(
        self,
        author: Literal["user", "gemini_flash_agent"],
        role: Literal["user", "model"],
        text: str,
    ):
        """Append a new conversation to the session"""
        event = aiplatform_v1beta1.SessionEvent(
            author=author,
            invocation_id="1",
            timestamp=datetime.now().strftime("%Y-%m-%dT%H:%M:%SZ"),
            content=aiplatform_v1beta1.Content(
                role=role, parts=[aiplatform_v1beta1.Part(text=text)]
            ),
        )

        self.sessions_client.append_event(name=self.session_name, event=event)

if __name__ == "__main__":
    USER_ID = "hideichi"
    project_id = "xxxxx"
    location = "us-central1"
    resource_id = "projects/xxxxx/locations/us-central1/reasoningEngines/3219396434407194624"
    session_name = "projects/xxxxx/locations/us-central1/reasoningEngines/3219396434407194624/sessions/7306477417676144640"

    session_tutorial = SessionTutorial(
        project_id=project_id,
        location=location,
        agent_engine_name=resource_id,
        session_name=session_name,
    )

    # イベントの追加前の会話履歴を閲覧する
    session_tutorial.show_list_events()

    #  イベントを追加する
    session_tutorial.append_new_conversation(
        author="user",
        role="user",
        text="こんにちは!",
    )

    # 上記で追加したイベントが確認
    session_tutorial.show_list_events()
まとめ
本記事では、Vertex AI Agent Builderの主要コンポーネントであるAgent Development KitとAgent Engineを活用してAIエージェントの構築とデプロイを行いました。
これにより、簡単なテキスト生成エージェントから外部関数やGoogle検索、さらには他のエージェントとの連携など、実用性の高い複雑なエージェントまで幅広く作成可能であることを示しました。
また、Agent Engineを用いることで、本番環境でのエージェント運用が簡単になり、インフラの管理を気にせずエージェント開発に専念できることもわかりました。
一方で、会話履歴の柔軟な管理が求められる場合など、Agent Engineが最適ではないユースケースについても触れました。
これらの知見を活かして、ユースケースに合わせた最適な構築方法を選択し、実践的なAIエージェント開発を進めてみてください。